Table of Contents
- 23.1. MySQL Connector/ODBC
- 23.2. Connector/NET
- 23.3. MySQL Connector/J
- 23.4. MySQL Connector/MXJ
- 23.4.1. Introduction
- 23.4.2. Supported Platforms
- 23.4.3. JUnit Test Requirements
- 23.4.4. Running the JUnit Tests
- 23.4.5. Running as part of the JDBC Driver
- 23.4.6. Running within a Java Object
- 23.4.7. The MysqldResource API
- 23.4.8. Running within a JMX Agent (custom)
- 23.4.9. Deployment in a standard JMX Agent environment (JBoss)
- 23.4.10. Installation
- 23.5. Connector/PHP
This chapter describes MySQL Connectors, drivers that provide connectivity to the MySQL server for client programs. There are currently five MySQL Connectors:
Connector/ODBC provides driver support for connecting to a MySQL server using the Open Database Connectivity (ODBC) API. Support is available for ODBC connectivity from Windows, Unix and Mac OS X platforms.
Connector/NET enables developers to create .NET applications that use data stored in a MySQL database. Connector/NET implement a fully-functional ADO.NET interface and provides support for use with ADO.NET aware tools. Applications that want to use Connector/NET can be written in any of the supported .NET languages.
Connector/J provides driver support for connecting to MySQL from a Java application using the standard Java Database Connectivity (JDBC) API.
Connector/MXJ is a tool that enables easy deployment and management of MySQL server and database through your Java application.
Connector/PHP is a Windows-only connector for PHP that provides the
mysqlandmysqliextensions for use with MySQL 5.0.18 and later.
For information on connecting to a MySQL server using other languages and interfaces than those detailed above, including Perl, Python and PHP for other platforms and environments, please refer to the Chapter 22, APIs and Libraries chapter.
The MySQL Connector/ODBC is the name for the family of MySQL ODBC drivers (also called MyODBC drivers) that provide access to a MySQL database using the industry standard Open Database Connectivity (ODBC) API. This reference covers Connector/ODBC 3.51, a version of the API that provides ODBC 3.5x compliant access to a MySQL database.
The manual for versions of MyODBC older than 3.51 can be located in the corresponding binary or source distribution.
For more information on the ODBC API standard and how to use it, refer to http://www.microsoft.com/data/.
The application development part of this reference assumes a good working knowledge of C, general DBMS knowledge, and finally, but not least, familiarity with MySQL. For more information about MySQL functionality and its syntax, refer to http://dev.mysql.com/doc/.
Typically, you need to install MyODBC only on Windows machines. For Unix and Mac OS X you can use the native MySQL network or named pipe to communicate with your MySQL database. You may need MyODBC for Unix or Mac OS X if you have an application that requires an ODBC interface to communicate with database.. Applications that require ODBC to communicate with MySQL include ColdFusion, Microsoft Office, and Filemaker Pro.
If you want to install the MyODBC connector on a Unix host, then you must also install an ODBC manager.
If you have questions that are not answered in this document, please
send a mail message to <myodbc@lists.mysql.com>.
ODBC (Open Database Connectivity) provides a way for client programs to access a wide range of databases or data sources. ODBC is a standardized API that allows connections to SQL database servers. It was developed according to the specifications of the SQL Access Group and defines a set of function calls, error codes, and data types that can be used to develop database-independent applications. ODBC usually is used when database independence or simultaneous access to different data sources is required.
For more information about ODBC, refer to http://www.microsoft.com/data/.
There are currently two version of MyODBC available:
MyODBC 5.0, currently in beta status, has been designed to extend the functionality of the MyODBC 3.51 driver and incorporate full support for the functionality in the MySQL 5.0 server release, including stored procedures and views. Applications using MyODBC 3.51 will be compatible with MyODBC 5.0, while being able to take advantage of the new features. Features and functionality of the MyODBC 5.0 driver are not currently included in this guide.
MyODBC 3.51 is the current release of the 32-bit ODBC driver, also known as the MySQL ODBC 3.51 driver. This version is enhanced compared to the older MyODBC 2.50 driver. It has support for ODBC 3.5x specification level 1 (complete core API + level 2 features) in order to continue to provide all functionality of ODBC for accessing MySQL.
MyODBC 2.50 is the previous version of the 32-bit ODBC driver from MySQL AB that is based on ODBC 2.50 specification level 0 (with level 1 and 2 features). Information about the MyODBC 2.50 driver is included in this guide for the purposes of comparison only.
Note: From this section onward, the primary focus of this guide is the MyODBC 3.51 driver. More information about the MyODBC 2.50 driver in the documentation included in the installation packages for that version. If there is a specific issue (error or known problem) that only affects the 2.50 version, it may be included here for reference.
Open Database Connectivity (ODBC) is a widely accepted application-programming interface (API) for database access. It is based on the Call-Level Interface (CLI) specifications from X/Open and ISO/IEC for database APIs and uses Structured Query Language (SQL) as its database access language.
A survey of ODBC functions supported by MyODBC is given at Section 23.1.5.1, “MyODBC API Reference”. For general information about ODBC, see http://www.microsoft.com/data/.
The MyODBC architecture is based on five components, as shown in the following diagram:
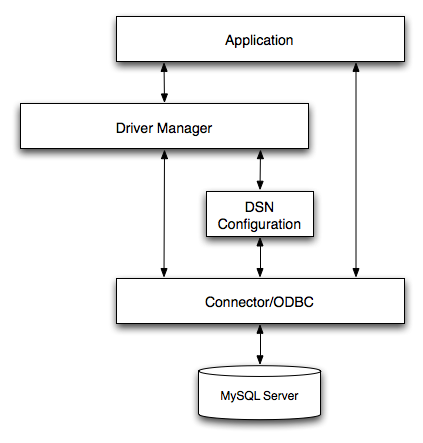
Application:
The Application uses the ODBC API to access the data from the MySQL server. The ODBC API in turn uses the communicates with the Driver Manager. The Application communicates with the Driver Manager using the standard ODBC calls. The Application does not care where the data is stored, how it is stored, or even how the system is configured to access the data. It needs to know only the Data Source Name (DSN).
A number of tasks are common to all applications, no matter how they use ODBC. These tasks are:
Selecting the MySQL server and connecting to it
Submitting SQL statements for execution
Retrieving results (if any)
Processing errors
Committing or rolling back the transaction enclosing the SQL statement
Disconnecting from the MySQL server
Because most data access work is done with SQL, the primary tasks for applications that use ODBC are submitting SQL statements and retrieving any results generated by those statements.
Driver manager:
The Driver Manager is a library that manages communication between application and driver or drivers. It performs the following tasks:
Resolves Data Source Names (DSN). The DSN is a configuration string that identifies a given database driver, database, database host and optionally authentication information that enables an ODBC application to connect to a database using a standardized reference.
Because the database connectivity information is identified by the DSN, any ODBC compliant application can connect to the data source using the same DSN reference. This eliminates the need to separately configure each application that needs access to a given database; instead you instruct the application to use a pre-configured DSN.
Loading and unloading of the driver required to access a specific database as defined within the DSN. For example, if you have configured a DSN that connects to a MySQL database then the driver manager will load the MyODBC driver to enable the ODBC API to communicate with the MySQL host.
Processes ODBC function calls or passes them to the driver for processing.
MyODBC Driver:
The MyODBC driver is a library that implements the functions supported by the ODBC API. It processes ODBC function calls, submits SQL requests to MySQL server, and returns results back to the application. If necessary, the driver modifies an application's request so that the request conforms to syntax supported by MySQL.
DSN Configuration:
The ODBC configuration file stores the driver and database information required to connect to the server. It is used by the Driver Manager to determine which driver to be loaded according to the definition in the DSN. The driver uses this to read connection parameters based on the DSN specified. For more information, Section 23.1.3, “MyODBC Configuration”.
MySQL Server:
The MySQL database where the information is stored. The database is used as the source of the data (during queries) and the destination for data (during inserts and updates).
An ODBC Driver Manager is a library that manages communication between the ODBC-aware application and any drivers. Its main functionality includes:
Resolving Data Source Names (DSN).
Driver loading and unloading.
Processing ODBC function calls or passing them to the driver.
Both Windows and Mac OS X include ODBC driver managers with the operating system. Most ODBC Driver Manager implementations also include an administration application that makes the configuration of DSN and drivers easier. Examples and information on these managers, including Unix ODBC driver managers are listed below:
Microsoft Windows ODBC Driver Manager (
odbc32.dll), http://www.microsoft.com/data/.Mac OS X includes
ODBC Administrator, a GUI application that provides a simpler configuration mechanism for the Unix iODBC Driver Manager. You can configure DSN and driver information either through ODBC Administrator or through the iODBC configuration files. This also means that you can test ODBC Administrator configurations using theiodbctestcommand. http://www.apple.com.unixODBCDriver Manager for Unix (libodbc.so). See http://www.unixodbc.org, for more information. TheunixODBCDriver Manager includes the MyODBC driver 3.51 in the installation package, starting with versionunixODBC2.1.2.iODBCODBC Driver Manager for Unix (libiodbc.so), see http://www.iodbc.org, for more information.
You can install the MyODBC drivers using two different methods, a binary installation and a source installation. The binary installation is the easiest and most straightforward method of installation. Using the source installation methods should only be necessary on platforms where a binary installation package is not available, or in situations where you want to customize or modify the installation process or MyODBC drivers before installation.
MySQL AB distributes all its products under the General Public License (GPL). You can get a copy of the latest version of MyODBC binaries and sources from the MySQL AB Web site http://dev.mysql.com/downloads/.
For more information about MyODBC, visit http://www.mysql.com/products/myodbc/.
For more information about licensing, visit http://www.mysql.com/company/legal/licensing/.
MyODBC can be used on all major platforms supported by MySQL. You can install it on:
Windows 95, 98, Me, NT, 2000, XP, and 2003
All Unix-like Operating Systems, including: AIX, Amiga, BSDI, DEC, FreeBSD, HP-UX 10/11, Linux, NetBSD, OpenBSD, OS/2, SGI Irix, Solaris, SunOS, SCO OpenServer, SCO UnixWare, Tru64 Unix
Mac OS X and Mac OS X Server
If a binary distribution is not available for a particular
platform, see Section 23.1.2.4, “Installing MyODBC from a source distribution”, to
build the driver from the original source code. You can
contribute the binaries you create to MySQL by sending a mail
message to <myodbc@lists.mysql.com>, so that it
becomes available for other users.
Using a binary distribution offers the most straightforward method for installing MyODBC. If you want more control over the driver, the installation location and or to customize elements of the driver you will need to build and install from the source. See the Section 23.1.2.4, “Installing MyODBC from a source distribution”.
Before installing the MyODBC drivers on Windows you should ensure that your Microsoft Data Access Components (MDAC) are up to date. You can obtain the latest version from the Microsoft Data Access and Storage website.
There are three available distribution types to use when installing for Windows. The contents in each case are identical, it is only the installation method which is different.
Zipped installer consists of a Zipped package containing a standalone installation application. To install from this package, you must unzip the installer, and then run the installation application. See Section 23.1.2.3.1.1, “Installing the Windows MyODBC Driver using an installer” to complete the installation.
MSI installer, an installation file that can be used with the installer included in Windows 2000, Windows XP and Windows Server 2003. See Section 23.1.2.3.1.1, “Installing the Windows MyODBC Driver using an installer” to complete the installation.
Zipped DLL package, containing the DLL files that need must be manually installed. See Section 23.1.2.3.1.2, “Installing the Windows MyODBC Driver using the Zipped DLL package” to complete the installation.
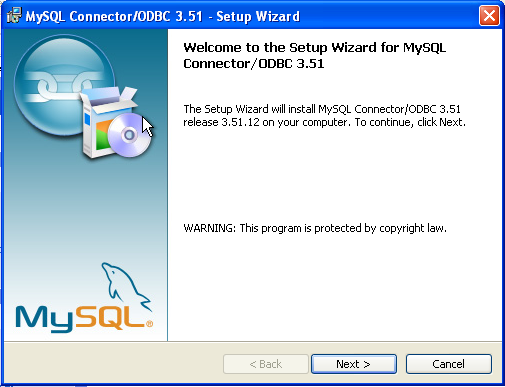
The installer packages offer a very simple method for installing the MyODBC drivers. If you have downloaded the zipped installer then you must extract the installer application. The basic installation process is identical for both installers.
You should follow these steps to complete the installation:
Double click on the standalone installer that you extracted, or the MSI file you downloaded.
The MySQL Connector/ODBC 3.51 - Setup Wizard will start. Click the button to begin the installation process.
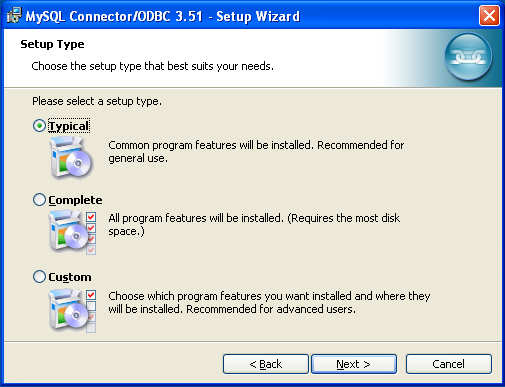
You will need to choose the installation type. The Typical installation provides the standard files you will need to connect to a MySQL database using ODBC. The Complete option installs all the available files, including debug and utility components. It is recommended you choose one of these two options to complete the installation. If choose one of these methods, click and then proceed to step 5.
You may also choose a Custom installation, which enables you to select the individual components that you want to install. You have chosen this method, click and then proceed to step 4.
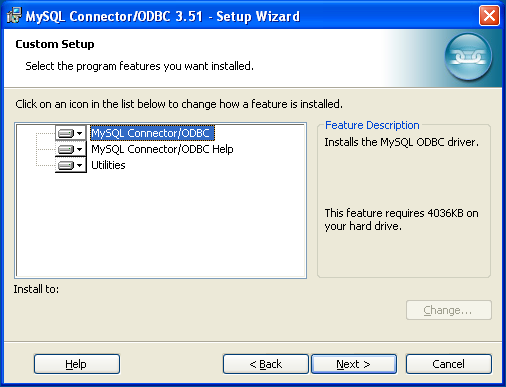
If you have chosen a custom installation, use the popups to select which components to install and then click to install the necessary files.
Once the files have copied to your machine, the installation is complete. Click to exit the installer.
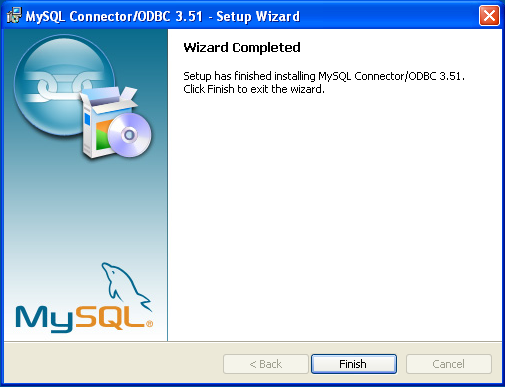
Now the installation is complete, you can continue to configure your ODBC connections using Section 23.1.3, “MyODBC Configuration”.
If you have downloaded the Zipped DLL package then you must install the individual files required for MyODBC operation manually. Once you have unzipped the installation files, you can either perform this operation by hand, executing each statement individually, or you can use the included Batch file to perform an installation to the default locations.
To install using the Batch file:
Unzip the MyODBC Zipped DLL package.
Open a Command Prompt.
Change to the directory created when you unzipped the MyODBC Zipped DLL package.
Run
Install.bat:C:\>
Install.batThis will copy the necessary files into the default location, and then register the MyODBC driver with the Windows ODBC manager.
If you want to copy the files to an alternative location - for example, to run or test different versions of the MyODBC driver on the same machine, then you must copy the files by hand. It is however not recommended to install these files in a non-standard location. To copy the files by hand to the default installation location use the following steps:
Unzip the MyODBC Zipped DLL package.
Open a Command Prompt.
Change to the directory created when you unzipped the MyODBC Zipped DLL package.
Copy the library files to a suitable directory. The default is to copy them into the default Windows system directory
\Windows\System32:C:\>
copy lib\myodbc3S.dll \Windows\System32C:\>copy lib\myodbc3S.lib \Windows\System32C:\>copy lib\myodbc3.dll \Windows\System32C:\>copy lib\myodbc3.lib \Windows\System32Copy the MyODBC tools. These must be placed into a directory that is in the system
PATH. The default is to install these into the Windows system directory\Windows\System32:C:\>
copy bin\myodbc3i.exe \Windows\System32C:\>copy bin\myodbc3m.exe \Windows\System32C:\>copy bin\myodbc3c.exe \Windows\System32Optionally copy the help files. For these files to be accessible through the help system, they must be installed in the Windows system directory:
C:\>
copy doc\*.hlp \Windows\System32Finally, you must register the MyODBC driver with the ODBC manager:
C:\> myodbc3i -a -d -t"MySQL ODBC 3.51 Driver;\
  DRIVER=myodbc3.dll;SETUP=myodbc3S.dll"
You must change the references to the DLL files and command location in the above statement if you have not installed these files into the default location.
On Windows, you may get the following error when trying to install the older MyODBC 2.50 driver:
An error occurred while copying C:\WINDOWS\SYSTEM\MFC30.DLL.
Restart Windows and try installing again (before running any
applications which use ODBC)
The reason for the error is that another application is
currently using the ODBC system. Windows may not allow you
to complete the installation. In most cases, you can
continue by pressing Ignore to copy the
rest of the MyODBC files and the final installation should
still work. If it doesn't, the solution is to re-boot your
computer in “safe mode.” Choose safe mode by
pressing F8 just before your machine starts Windows during
re-booting, install the MyODBC drivers, and re-boot to
normal mode.
There are two methods available for installing MyODBC on Unix from a binary distribution. For most Unix environments you will need to use the tarball distribution. For Linux systems, there is also an RPM distribution available.
To install the driver from a tarball distribution
(.tar.gz file), download the latest
version of the driver for your operating system and follow
these steps that demonstrate the process using the Linux
version of the tarball:
shell>su rootshell>gunzip MyODBC-3.51.11-i686-pc-linux.tar.gzshell>tar xvf MyODBC-3.51.11-i686-pc-linux.tarshell>cd MyODBC-3.51.11-i686-pc-linux
Read the installation instructions in the
INSTALL-BINARY file and execute these
commands.
shell>cp libmyodbc* /usr/local/libshell>cp odbc.ini /usr/local/etcshell>export ODBCINI=/usr/local/etc/odbc.ini
Then proceed on to
Section 23.1.3.4, “Configuring a MyODBC DSN on Unix”,
to configure the DSN for MyODBC. For more information, refer
to the INSTALL-BINARY file that comes
with your distribution.
To install or upgrade MyODBC from an RPM distribution on
Linux, simply download the RPM distribution of the latest
version of MyODBC and follow the instructions below. Use
su root to become
root, then install the RPM file.
If you are installing for the first time:
shell>su rootshell>rpm -ivh MyODBC-3.51.12.i386.rpm
If the driver exists, upgrade it like this:
shell>su rootshell>rpm -Uvh MyODBC-3.51.12.i386.rpm
If there is any dependency error for MySQL client library,
libmysqlclient, simply ignore it by
supplying the --nodeps option, and then
make sure the MySQL client shared library is in the path or
set through LD_LIBRARY_PATH.
This installs the driver libraries and related documents to
/usr/local/lib and
/usr/share/doc/MyODBC, respectively.
Proceed onto
Section 23.1.3.4, “Configuring a MyODBC DSN on Unix”.
To uninstall the driver,
become root and execute an
rpm command:
shell>su rootshell>rpm -e MyODBC
Mac OS X is based on the FreeBSD operating system, and you can normally use the MySQL network port for connecting to MySQL servers on other hosts. Installing the MyODBC driver enables you to connect to MySQL databases on any platform through the ODBC interface. You should only need to install the MyODBC driver when your application requires an ODBC interface. Applications that require or can use ODBC (and therefore the MyODBC driver) include ColdFusion, Filemaker Pro, 4th Dimension and many other applications.
Mac OS X includes its own ODBC manager, based on the
iODBC manager. Mac OS X includes an
administration tool that provides easier administration of
ODBC drivers and configuration, updating the underlying
iODBC configuration files.
You can install MyODBC on a Mac OS X or Mac OS X Server
computer by using the binary distribution. The package is
available as a compressed disk image
(.dmg) file. To install MyODBC on your
computer using this method, follow these steps:
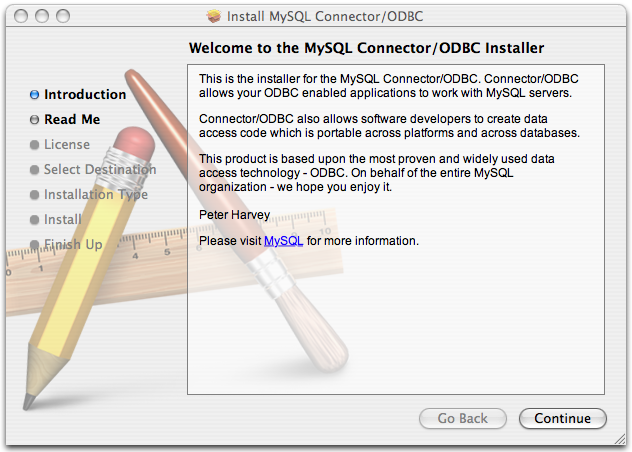
Download the file to your computer and double-click on the downloaded image file.
Within the disk image you will find an installer package (with the
.pkgextension). Double click on this file to start the Mac OS X installer.You will be presented with the installer welcome message. Click the button to begin the installation process.
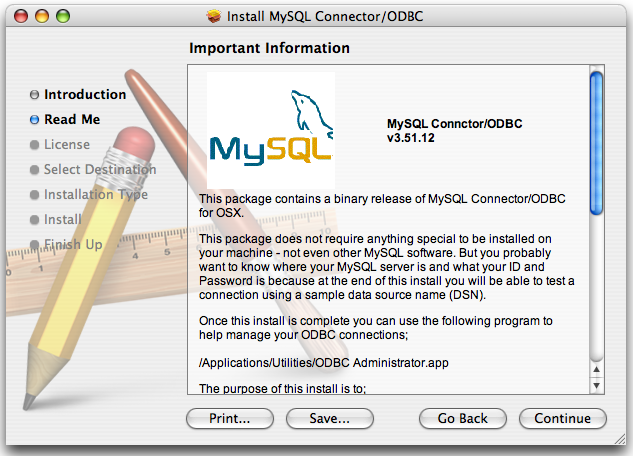
Please take the time to read the Important Information as it contains guidance on how to complete the installation process. Note that if you want to test a connection to a MySQL database, you will need location of your MySQL server, and a user and password to use to create a suitable DSN to test your installation. Testing the connection is not required to complete the installation. Once you have read the notice and collected the necessary information, click .
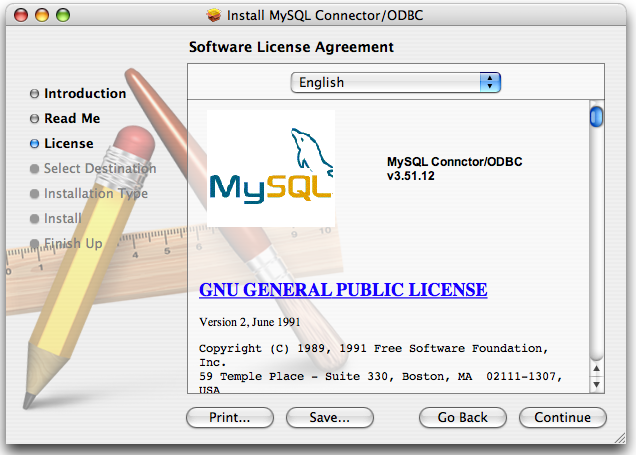
MyODBC drivers are made available under the GNU General Public License. Please read the license if you are not familiar with it before continuing installation. Click to approve the license (you will be asked to confirm that decision) and continue the installation.
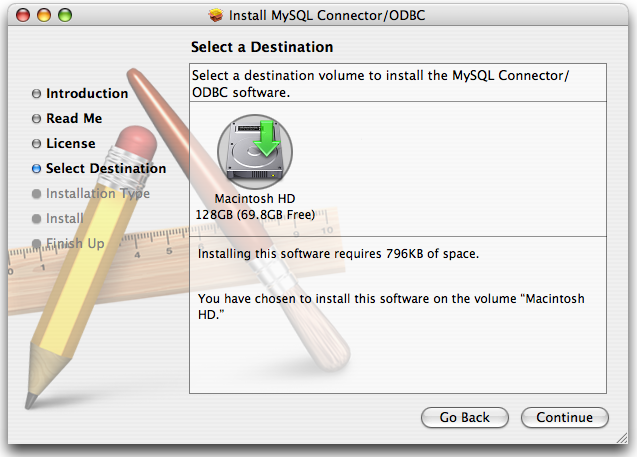
Choose a location to install the MyODBC drivers and the ODBC Administrator application. You must install the files onto a drive with an operating system and you may be limited in the choices available. Select the drive you want to use, and then click .
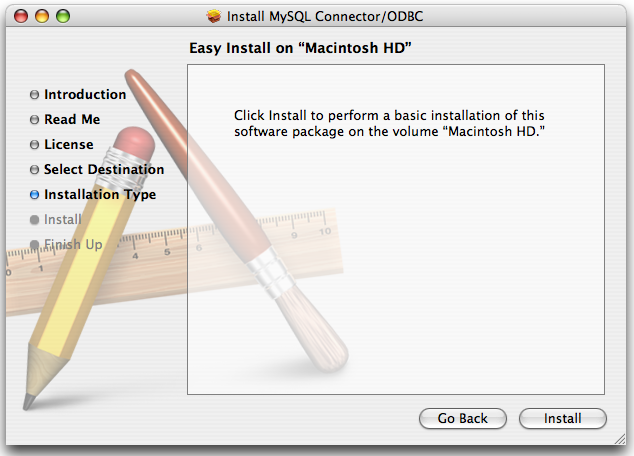
The installer will automatically select the files that need to be installed on your machine. Click to continue. The installer will copy the necessary files to your machine. A progress bar will be shown indicating the installation progress.
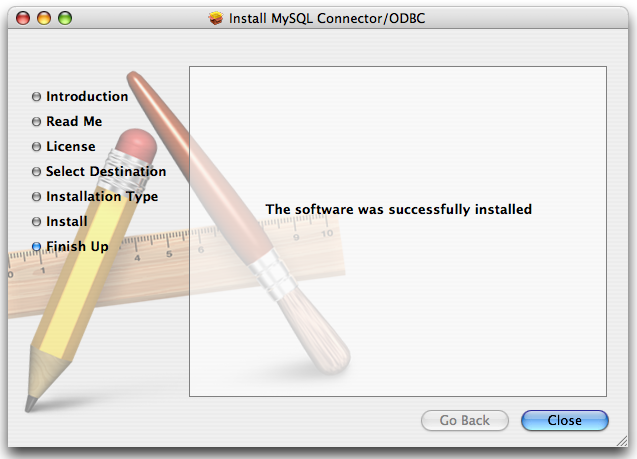
When installation has been completed you will get a window like the one shown below. Click to close and quit the installer.
Installing MyODBC from a source distribution gives you greater flexibility in the contents and installation location of the MyODBC components. It also enables you to build and install MyODBC on platforms where a pre-compiled binary is not available.
MyODBC sources are available either as a downloadable package, or through the revision control system used by the MyODBC developers.
You should only need to install MyODBC from source on Windows if you want to change or modify the source or installation. If you are unsure whether to install from source, please use the binary installation detailed in Section 23.1.2.3.1, “Installing MyODBC from a Binary Distribution on Windows”.
Installing MyODBC from source on Windows requires a number of different tools and packages:
MDAC, Microsoft Data Access SDK from http://www.microsoft.com/data/.
Suitable C compiler, such as Microsoft Visual C++ or the C compiler included with Microsoft Visual Studio.
Compatible
maketool. Microsoft'snmakeis used in the examples in this section.MySQL client libraries and include files from MySQL 4.0.0 or higher. (Preferably MySQL 4.0.16 or higher). This is required because MyODBC uses new calls and structures that exist only starting from this version of the library. To get the client libraries and include files, visit http://dev.mysql.com/downloads/.
MyODBC source distributions include
Makefiles that require the
nmake or other make
utility. In the distribution, you can find
Makefile for building the release
version and Makefile_debug for building
debugging versions of the driver libraries and DLLs.
To build the driver, use this procedure:
Download and extract the sources to a folder, then change directory into that folder. The following command assumes the folder is named
myodbc3-src:C:\>
cd myodbc3-srcEdit
Makefileto specify the correct path for the MySQL client libraries and header files. Then use the following commands to build and install the release version:C:\>
nmake -f MakefileC:\>nmake -f Makefile installnmake -f Makefile builds the release version of the driver and places the binaries in subdirectory called
Release.nmake -f Makefile install installs (copies) the driver DLLs and libraries (
myodbc3.dll,myodbc3.lib) to your system directory.To build the debug version, use
Makefile_Debugrather thanMakefile, as shown below:C:\>
nmake -f Makefile_debugC:\>nmake -f Makefile_debug installYou can clean and rebuild the driver by using:
C:\>
nmake -f Makefile cleanC:\>nmake -f Makefile install
Note:
Make sure to specify the correct MySQL client libraries and header files path in the Makefiles (set the
MYSQL_LIB_PATHandMYSQL_INCLUDE_PATHvariables). The default header file path is assumed to beC:\mysql\include. The default library path is assumed to beC:\mysql\lib\optfor release DLLs andC:\mysql\lib\debugfor debug versions.For the complete usage of nmake, visit http://msdn.microsoft.com/library/default.asp?url=/library/en-us/dv_vcce4/html/evgrfRunningNMAKE.asp.
If you are using the Subversion tree for compiling, all Windows-specific
Makefilesare named asWin_Makefile*.
After the driver libraries are copied/installed to the
system directory, you can test whether the libraries are
properly built by using the samples provided in the
samples subdirectory:
C:\>cd samplesC:\>nmake -f Makefile all
You need the following tools to build MySQL from source on Unix:
A working ANSI C++ compiler. gcc 2.95.2 or later, egcs 1.0.2 or later or egcs 2.91.66, SGI C++, and SunPro C++ are some of the compilers that are known to work.
A good make program. GNU make is always recommended and is sometimes required.
MySQL client libraries and include files from MySQL 4.0.0 or higher. (Preferably MySQL 4.0.16 or higher). This is required because MyODBC uses new calls and structures that exist only starting from this version of the library. To get the client libraries and include files, visit http://dev.mysql.com/downloads/.
If you have built your own MySQL server and/or client libraries from source then you must have used the
--enable-thread-safe-clientoption toconfigurewhen the libraries were built.You should also ensure that the
libmysqlclientlibrary were built and installed as a shared library.A compatible ODBC manager must be installed. MyODBC is known to work with the
iODBCandunixODBCmanagers. See Section 23.1.1.2.2, “ODBC Driver Managers”, for more information.If you are using a character set that isn't compiled into the MySQL client library then you need to install the MySQL character definitions from the
charsetsdirectory intoSHAREDIR(by default,/usr/local/mysql/share/mysql/charsets). These should be in place if you have installed the MySQL server on the same machine. See Chapter 10, Character Set Support, for more information on character set support.
Once you have all the required files, unpack the source files to a separate directory, you then have to run configure and build the library using make.
The configure script gives you a great deal of control over how you configure your MyODBC build. Typically you do this using options on the configure command line. You can also affect configure using certain environment variables. For a list of options and environment variables supported by configure, run this command:
shell> ./configure --help
Some of the more commonly used configure options are described here:
To compile MyODBC, you need to supply the MySQL client include and library files path using the
--with-mysql-path=option, whereDIRDIRis the directory where MySQL is installed.MySQL compile options can be determined by running
DIR/bin/mysql_configSupply the standard header and library files path for your ODBC Driver Manager (
iODBCorunixODBC).If you are using
iODBCandiODBCis not installed in its default location (/usr/local), you might have to use the--with-iodbc=option, whereDIRDIRis the directory whereiODBCis installed.If the
iODBCheaders do not reside inDIR/include--with-iodbc-includes=option to specify their location.INCDIRThe applies to libraries. If they are not in
DIR/lib--with-iodbc-libs=option.LIBDIRIf you are using
unixODBC, use the--with-unixODBC=option (case sensitive) to make configure look forDIRunixODBCinstead ofiODBCby default,DIRis the directory whereunixODBCis installed.If the
unixODBCheaders and libraries aren't located inDIR/includeDIR/lib--with-unixODBC-includes=andINCDIR--with-unixODBC-libs=options.LIBDIR
You might want to specify an installation prefix other than
/usr/local. For example, to install the MyODBC drivers in/usr/local/odbc/lib, use the--prefix=/usr/local/odbcoption.
The final configuration command looks something like this:
shell>./configure --prefix=/usr/local \--with-iodbc=/usr/local \--with-mysql-path=/usr/local/mysql
There are a number of other options that you need, or want, to set when configuring the MyODBC driver before it is built.
To link the driver with MySQL thread safe client libraries
libmysqlclient_r.soorlibmysqlclient_r.a, you must specify the following configure option:--enable-thread-safe
and can be disabled (default) using
--disable-thread-safe
This option enables the building of the driver thread-safe library
libmyodbc3_r.sofrom by linking with MySQL thread-safe client librarylibmysqlclient_r.so(The extensions are OS dependent).If the compilation with the thread-safe option fails, it may be because the correct thread-libraries on the system could not be located. You should set the value of
LIBSto point to the correct thread library for your system.LIBS="-lpthread" ./configure ..
You can enable or disable the shared and static versions of MyODBC using these options:
--enable-shared[=yes/no]
--disable-shared
--enable-static[=yes/no]
--disable-static
By default, all the binary distributions are built as non-debugging versions (configured with
--without-debug).To enable debugging information, build the driver from source distribution and use the
--with-debugoption when you run configure.This option is available only for source trees that have been obtained from the Subversion repository. This option does not apply to the packaged source distributions.
By default, the driver is built with the
--without-docsoption. If you would like the documentation to be built, then execute configure with:--with-docs
To build the driver libraries, you have to just execute make.
shell> make
If any errors occur, correct them and continue the build
process. If you aren't able to build, then send a detailed
email to <myodbc@lists.mysql.com> for further
assistance.
On most platforms, MySQL does not build or support
.so (shared) client libraries by
default. This is based on our experience of problems when
building shared libraries.
In cases like this, you have to download the MySQL distribution and configure it with these options:
--without-server --enable-shared
To build shared driver libraries, you must specify the
--enable-shared option for
configure. By default,
configure does not enable this option.
If you have configured with the
--disable-shared option, you can build the
.so file from the static libraries
using the following commands:
shell>cd MyODBC-3.51.01shell>makeshell>cd drivershell>CC=/usr/bin/gcc \$CC -bundle -flat_namespace -undefined error \-o .libs/libmyodbc3-3.51.01.so \catalog.o connect.o cursor.o dll.o error.o execute.o \handle.o info.o misc.o myodbc3.o options.o prepare.o \results.o transact.o utility.o \-L/usr/local/mysql/lib/mysql/ \-L/usr/local/iodbc/lib/ \-lz -lc -lmysqlclient -liodbcinst
Make sure to change -liodbcinst to
-lodbcinst if you are using
unixODBC instead of
iODBC, and configure the library paths
accordingly.
This builds and places the
libmyodbc3-3.51.01.so file in the
.libs directory. Copy this file to the
MyODBC library installation directory
(/usr/local/lib (or the
lib directory under the installation
directory that you supplied with the
--prefix).
shell>cd .libsshell>cp libmyodbc3-3.51.01.so /usr/local/libshell>cd /usr/local/libshell>ln -s libmyodbc3-3.51.01.so libmyodbc3.so
To build the thread-safe driver library:
shell>CC=/usr/bin/gcc \$CC -bundle -flat_namespace -undefined error-o .libs/libmyodbc3_r-3.51.01.socatalog.o connect.o cursor.o dll.o error.o execute.ohandle.o info.o misc.o myodbc3.o options.o prepare.oresults.o transact.o utility.o-L/usr/local/mysql/lib/mysql/-L/usr/local/iodbc/lib/-lz -lc -lmysqlclient_r -liodbcinst
To install the driver libraries, execute the following command:
shell> make install
That command installs one of the following sets of libraries:
For MyODBC 3.51:
libmyodbc3.solibmyodbc3-3.51.01.so, where 3.51.01 is the version of the driverlibmyodbc3.a
For thread-safe MyODBC 3.51:
libmyodbc3_r.solibmyodbc3-3_r.51.01.solibmyodbc3_r.a
For MyODBC 2.5.0:
libmyodbc.solibmyodbc-2.50.39.so, where 2.50.39 is the version of the driverlibmyodbc.a
For more information on build process, refer to the
INSTALL file that comes with the source
distribution. Note that if you are trying to use the
make from Sun, you may end up with
errors. On the other hand, GNU gmake
should work fine on all platforms.
To run the basic samples provided in the distribution with the libraries that you built, use the following command:
shell> make test
Before running the tests, create the DSN 'myodbc3' in
odbc.ini and set the environment
variable ODBCINI to the correct
odbc.ini file; and MySQL server is
running. You can find a sample odbc.ini
with the driver distribution.
You can even modify the
samples/run-samples script to pass the
desired DSN, UID, and PASSWORD values as the command-line
arguments to each sample.
To build the driver on Mac OS X (Darwin), make use of the following configure example:
shell>./configure --prefix=/usr/local--with-unixODBC=/usr/local--with-mysql-path=/usr/local/mysql--disable-shared--enable-gui=no--host=powerpc-apple
The command assumes that the unixODBC and
MySQL are installed in the default locations. If not,
configure accordingly.
On Mac OS X, --enable-shared builds
.dylib files by default. You can build
.so files like this:
shell>makeshell>cd drivershell>CC=/usr/bin/gcc \$CC -bundle -flat_namespace -undefined error-o .libs/libmyodbc3-3.51.01.so *.o-L/usr/local/mysql/lib/-L/usr/local/iodbc/lib-liodbcinst -lmysqlclient -lz -lc
To build the thread-safe driver library:
shell>CC=/usr/bin/gcc \$CC -bundle -flat_namespace -undefined error-o .libs/libmyodbc3-3.51.01.so *.o-L/usr/local/mysql/lib/-L/usr/local/iodbc/lib-liodbcinst -lmysqlclienti_r -lz -lc -lpthread
Make sure to change the -liodbcinst to
-lodbcinst in case of using
unixODBC instead of
iODBC and configure the libraries path
accordingly.
In Apple's version of GCC, both cc and gcc are actually symbolic links to gcc3.
Copy this library to the $prefix/lib
directory and symlink to libmyodbc3.so.
You can cross-check the output shared-library properties using this command:
shell> otool -LD .libs/libmyodbc3-3.51.01.so
To build the driver on HP-UX 10.x or 11.x, make use of the following configure example:
If using cc:
shell>CC="cc" \CFLAGS="+z" \LDFLAGS="-Wl,+b:-Wl,+s" \./configure --prefix=/usr/local--with-unixodbc=/usr/local--with-mysql-path=/usr/local/mysql/lib/mysql--enable-shared--enable-thread-safe
If using gcc:
shell>CC="gcc" \LDFLAGS="-Wl,+b:-Wl,+s" \./configure --prefix=/usr/local--with-unixodbc=/usr/local--with-mysql-path=/usr/local/mysql--enable-shared--enable-thread-safe
Once the driver is built, cross-check its attributes using
chatr .libs/libmyodbc3.sl to determine
whether you need to have set the MySQL client library path
using the SHLIB_PATH environment
variable. For static versions, ignore all shared-library
options and run configure with the
--disable-shared option.
To build the driver on AIX, make use of the following configure example:
shell>./configure --prefix=/usr/local--with-unixodbc=/usr/local--with-mysql-path=/usr/local/mysql--disable-shared--enable-thread-safe
NOTE: For more information about how to build and set up the static and shared libraries across the different platforms refer to ' Using static and shared libraries across platforms'.
Caution: You should read this section only if you are interested in helping us test our new code. If you just want to get MySQL Connector/ODBC up and running on your system, you should use a standard release distribution.
To be able to access the MyODBC source tree, you must have Subversion installed. Subversion is freely available from http://subversion.tigris.org/.
To build from the source trees, you need the following tools:
autoconf 2.52 (or newer)
automake 1.4 (or newer)
libtool 1.4 (or newer)
m4
The most recent development source tree is available from our public Subversion trees at http://dev.mysql.com/tech-resources/sources.html.
To checkout out the Connector/ODBC sources, change to the directory where you want the copy of the MyODBC tree to be stored, then use the following command:
shell> svn co http://svn.mysql.com/svnpublic/connector-odbc3
You should now have a copy of the entire MyODBC source tree in
the directory connector-odbc3. To build
from this source tree on Unix or Linux follow these steps:
shell>cd connector-odbc3shell>aclocalshell>autoheadershell>autoconfshell>automake;shell>./configure # Add your favorite options hereshell>make
For more information on how to build, refer to the
INSTALL file located in the same
directory. For more information on options to
configure, see
Section 23.1.2.4.2.1, “Typical configure Options”
When the build is done, run make install to install the MyODBC 3.51 driver on your system.
If you have gotten to the make stage and
the distribution does not compile, please report it to
<myodbc@lists.mysql.com>.
On Windows, make use of Windows Makefiles
WIN-Makefile and
WIN-Makefile_debug in building the
driver. For more information, see
Section 23.1.2.4.1, “Installing MyODBC from a Source Distribution on Windows”.
After the initial checkout operation to get the source tree, you should run svn update periodically update your source according to the latest version.
Before you connect to a MySQL database using the MyODBC driver you must configure an ODBC Data Source Name. The DSN associates the various configuration parameters required to communicate with a database to a specific name. You use the DSN in an application to communicate with the database, rather than specifying individual parameters within the application itself. DSN information can be user specific, system specific, or provided in a special file. ODBC data source names are configured in different ways, depending on your platform and ODBC driver.
A Data Source Name associates the configuration parameters for communicating with a specific database. Generally a DSN consists of the following parameters:
- Name
- Hostname
- Database Name
- Login
- Password
In addition, different ODBC drivers, including MyODBC, may accept additional driver-specific options and parameters.
There are three types of DSN:
A System DSN is a global DSN definition that is available to any user and application on a particular system. A System DSN can normally only be configured by a systems administrator, or by a user who has specific permissions that let them create System DSNs.
A User DSN is specific to an individual user, and can be used to store database connectivity information that the user regularly uses.
A File DSN uses a simple file to define the DSN configuration. File DSNs can be shared between users and machines and are therefore more practical when installing or deploying DSN information as part of an application across many machines.
DSN information is stored in different locations depending on your platform and environment.
The ODBC Data Source Administrator within
Windows enables you to create DSNs, check driver installation
and configure ODBC systems such as tracing (used for debugging)
and connection pooling.
Different editions and versions of Windows store the
ODBC Data Source Administrator in different
locations depending on the version of Windows that you are
using.
To open the ODBC Data Source Administrator in
Windows Server 2003:
On the
Startmenu, chooseAdministrative Tools, and then clickData Sources (ODBC).
To open the ODBC Data Source Administrator in
Windows 2000 Server or Windows 2000 Professional:
On the
Startmenu, chooseSettings, and then clickControl Panel.In
Control Panel, clickAdministrative Tools.In
Administrative Tools, clickData Sources (ODBC).
To open the ODBC Data Source Administrator on
Windows XP:
On the
Startmenu, clickControl Panel.In the
Control Panelwhen inCategory ViewclickPerformance and Maintenanceand then clickAdministrative Tools.. If you are viewing theControl PanelinClassic View, clickAdministrative Tools.In
Administrative Tools, clickData Sources (ODBC).
Irrespective of your Windows version, you should be presented
the ODBC Data Source Administrator window:

Within Windows XP, you can add the Administrative
Tools folder to your menu
to make it easier to locate the ODBC Data Source Administrator.
To do this:
Right click on the menu.
Select
Properties.Click .
Select the tab.
Within
Start menu items, within theSystem Administrative Toolssection, selectDisplay on the All Programs menu.
Within both Windows Server 2003 and Windows XP you may want to
permanently add the ODBC Data Source
Administrator to your
menu. To do this, locate the Data Sources
(ODBC) icon using the methods shown, then right-click
on the icon and then choose .
To add and configure a new MyODBC data source on Windows, use
the ODBC Data Source Administrator:
Open the
ODBC Data Source Administrator.To create a System DSN (which will be available to all users) , select the
System DSNtab. To create a User DSN, which will be unique only to the current user, click the button.You will need to select the ODBC driver for this DSN.
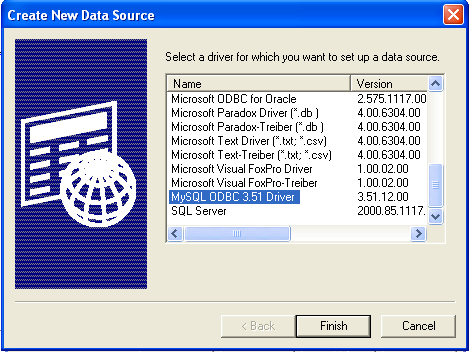
Select
MySQL ODBC 3.51 Driver, then clickFinish.You now need to configure the specific fields for the DSN you are creating through the
Add Data Source Namedialog.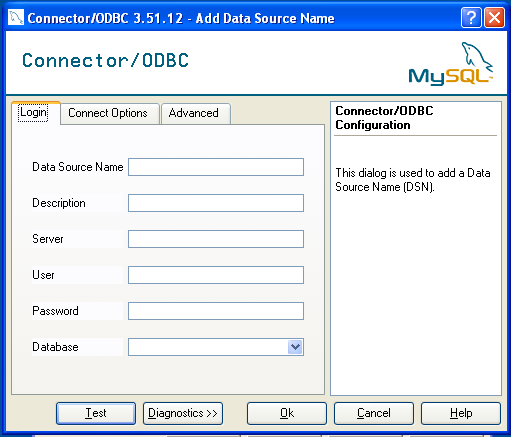
In the
Data Source Namebox, enter the name of the data source you want to access. It can be any valid name that you choose.In the
Descriptionbox, enter some text to help identify the connection.In the
Serverfield, enter the name of the MySQL server host that you want to access. By default, it islocalhost.In the
Userfield, enter the user name to use for this connection.In the
Passwordfield, enter the corresponding password for this connection.The
Databasepopup should automatically populate with the list of databases that the user has permissions to access.Click to save the DSN.
A completed DSN configuration may look like this:
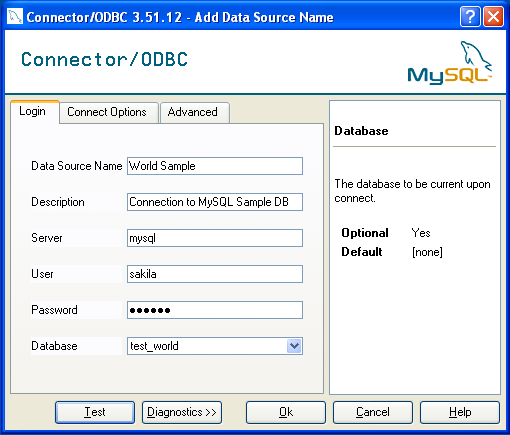
You can verify the connection using the parameters you have
entered by clicking the button. If
the connection could be made successfully, you will be
notified with a Success; connection was
made! dialog.
If the connection failed, you can obtain more information on the test and why it may have failed by clicking the button to show additional error messages.
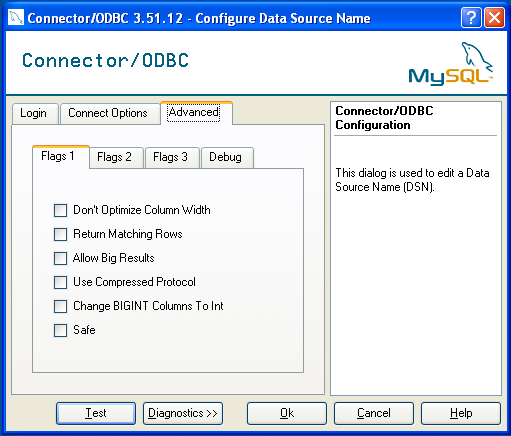
You can configure a number of options for a specific DSN by using either the or tabs in the DSN configuration dialog.
The dialog can be seen below.
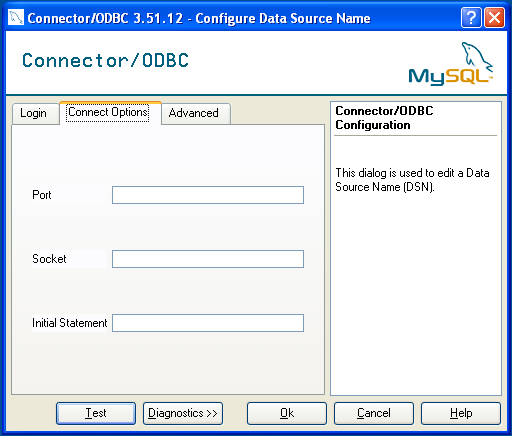
The three options you can configure are:
Portsets the TCP/IP port number to use when communicating with MySQL. Communication with MySQL uses port 3306 by default. If your server is configured to use a different TCP/IP port, you must specify that port number here.Socketsets the name or location of a specific socket or Windows pipe to use when communicating with MySQL.Initial Statementdefines an SQL statement that will be executed when the connection to MySQL is opened. You can use this to set MySQL options for your connection, such as setting the default character set or database to use during your connection.
The tab enables you to configure MyODBC connection parameters. Refer to Section 23.1.3.5, “MyODBC Connection Parameters”, for information about the meaning of these options.
This section answers MyODBC connection-related questions.
While configuring a MyODBC DSN, a
Could Not Load Translator or Setup Libraryerror occursFor more information, refer to MS KnowledgeBase Article(Q260558). Also, make sure you have the latest valid
ctl3d32.dllin your system directory.On Windows, the default
myodbc3.dllis compiled for optimal performance. If you want to debug MyODBC 3.51 (for example, to enable tracing), you should instead usemyodbc3d.dll. To install this file, copymyodbc3d.dllover the installedmyodbc3.dllfile. Make sure to revert back to the release version of the driver DLL once you are done with the debugging because the debug version may cause performance issues. Note that themyodbc3d.dllisn't included in MyODBC 3.51.07 through 3.51.11. If you are using one of these versions, you should copy that DLL from a previous version (for example, 3.51.06).For MyODBC 2.50,
myodbc.dllandmyodbcd.dllare used instead.
To configure a DSN on Mac OS X you should use the ODBC Administrator. If you have Mac OS X 10.2 or earlier, refer to Section 23.1.3.4, “Configuring a MyODBC DSN on Unix”. Select whether you want to create a User DSN or a System DSN. If you want to add a System DSN, you may need to authenticate with the system. You must click the padlock and enter a user and password with administrator privileges.
Open the ODBC Administrator from the
Utilitiesfolder in theApplicationsfolder.
On the User DSN or System DSN panel, click
Select the MyODBC driver and click .
You will be presented with the
Data Source Namedialog. Enter TheData Source Nameand an optionalDescriptionfor the DSN.
Click to add a new keyword/value pair to the panel. You should configure at least four pairs to specify the
server,username,passwordanddatabaseconnection parameters. See Section 23.1.3.5, “MyODBC Connection Parameters”.Click to add the DSN to the list of configured data source names.
A completed DSN configuration may look like this:
You can configure additional ODBC options to your DSN by adding further keyword/value pairs and setting the corresponding values. See Section 23.1.3.5, “MyODBC Connection Parameters”.
On Unix, you configure DSN entries directly
in the odbc.ini file. Here is a typical
odbc.ini file that configures
myodbc and myodbc3 as the
DSN names for MyODBC 2.50 and MyODBC 3.51, respectively:
; ; odbc.ini configuration for MyODBC and MyODBC 3.51 drivers ; [ODBC Data Sources] myodbc = MyODBC 2.50 Driver DSN myodbc3 = MyODBC 3.51 Driver DSN [myodbc] Driver = /usr/local/lib/libmyodbc.so Description = MyODBC 2.50 Driver DSN SERVER = localhost PORT = USER = root Password = Database = test OPTION = 3 SOCKET = [myodbc3] Driver = /usr/local/lib/libmyodbc3.so Description = MyODBC 3.51 Driver DSN SERVER = localhost PORT = USER = root Password = Database = test OPTION = 3 SOCKET = [Default] Driver = /usr/local/lib/libmyodbc3.so Description = MyODBC 3.51 Driver DSN SERVER = localhost PORT = USER = root Password = Database = test OPTION = 3 SOCKET =
Refer to the Section 23.1.3.5, “MyODBC Connection Parameters”, for the list of connection parameters that can be supplied.
Note: If you are using
unixODBC, you can use the following tools to
set up the DSN:
ODBCConfig GUI tool(HOWTO: ODBCConfig)
odbcinst
In some cases when using unixODBC, you might
get this error:
Data source name not found and no default driver specified
If this happens, make sure the ODBCINI and
ODBCSYSINI environment variables are pointing
to the right odbc.ini file. For example, if
your odbc.ini file is located in
/usr/local/etc, set the environment
variables like this:
export ODBCINI=/usr/local/etc/odbc.ini export ODBCSYSINI=/usr/local/etc
You can specify the parameters in the following tables for
MyODBC when configuring a DSN. Users on Windows can use the
Options and Advanced panels when configuring a DSN to set these
parameters; see the table for information on which options
relate to which fields and checkboxes. On Unix and Mac OS X, use
the parameter name and value as the keyword/value pair in the
DSN configuration. Alternatively, you can set these parameters
within the InConnectionString argument in the
SQLDriverConnect() call.
| Parameter | Default Value | Comment |
user | ODBC (on Windows) | The username used to connect to MySQL. |
server | localhost | The hostname of the MySQL server. |
database | The default database. | |
option | 0 | Options that specify how MyODBC should work. See below. |
port | 3306 | The TCP/IP port to use if server is not
localhost. |
stmt | A statement to execute when connecting to MySQL. | |
password | The password for the user account on
server. | |
socket | The Unix socket file or Windows named pipe to connect to if
server is
localhost. |
The option argument is used to tell MyODBC
that the client isn't 100% ODBC compliant. On Windows, you
normally select options by toggling the checkboxes in the
connection screen, but you can also select them in the
option argument. The following options are
listed in the order in which they appear in the MyODBC connect
screen:
| Value | Windows Checkbox | Description |
| 1 | Don't Optimized Column Width | The client can't handle that MyODBC returns the real width of a column. |
| 2 | Return Matching Rows | The client can't handle that MySQL returns the true value of affected rows. If this flag is set, MySQL returns “found rows” instead. You must have MySQL 3.21.14 or newer to get this to work. |
| 4 | Trace Driver Calls To myodbc.log | Make a debug log in C:\myodbc.log on Windows, or
/tmp/myodbc.log on Unix variants. |
| 8 | Allow Big Results | Don't set any packet limit for results and parameters. |
| 16 | Don't Prompt Upon Connect | Don't prompt for questions even if driver would like to prompt. |
| 32 | Enable Dynamic Cursor | Enable or disable the dynamic cursor support. (Not allowed in MyODBC 2.50.) |
| 64 | Ignore # in Table Name | Ignore use of database name in
db_name.tbl_name.col_name. |
| 128 | User Manager Cursors | Force use of ODBC manager cursors (experimental). |
| 256 | Don't Use Set Locale | Disable the use of extended fetch (experimental). |
| 512 | Pad Char To Full Length | Pad CHAR columns to full column length. |
| 1024 | Return Table Names for SQLDescribeCol | SQLDescribeCol() returns fully qualified column
names. |
| 2048 | Use Compressed Protocol | Use the compressed client/server protocol. |
| 4096 | Ignore Space After Function Names | Tell server to ignore space after function name and before
‘(’ (needed by
PowerBuilder). This makes all function names keywords. |
| 8192 | Force Use of Named Pipes | Connect with named pipes to a mysqld server running on NT. |
| 16384 | Change BIGINT Columns to Int | Change BIGINT columns to INT
columns (some applications can't handle
BIGINT). |
| 32768 | No Catalog (exp) | Return 'user' as Table_qualifier and
Table_owner from
SQLTables (experimental). |
| 65536 | Read Options From my.cnf | Read parameters from the [client] and
[odbc] groups from
my.cnf. |
| 131072 | Safe | Add some extra safety checks (should not be needed but...). |
| 262144 | Disable transaction | Disable transactions. |
| 524288 | Save queries to myodbc.sql | Enable query logging to
c:\myodbc.sql(/tmp/myodbc.sql)
file. (Enabled only in debug mode.) |
| 1048576 | Don't Cache Result (forward only cursors) | Do not cache the results locally in the driver, instead read from server
(mysql_use_result()). This works only
for forward-only cursors. This option is very important
in dealing with large tables when you don't want the
driver to cache the entire result set. |
| 2097152 | Force Use Of Forward Only Cursors | Force the use of Forward-only cursor type. In case of
applications setting the default static/dynamic cursor
type, and one wants the driver to use non-cache result
sets, then this option ensures the forward-only cursor
behavior. |
To select multiple options, add together their values. For
example, setting option to 12 (4+8) gives you
debugging without packet limits.
The following table shows some recommended
option values for various configurations:
| Configuration | Option Value |
| Microsoft Access, Visual Basic | 3 |
| Driver trace generation (Debug mode) | 4 |
| Microsoft Access (with improved DELETE queries) | 35 |
| Large tables with too many rows | 2049 |
| Sybase PowerBuilder | 135168 |
| Query log generation (Debug mode) | 524288 |
| Generate driver trace as well as query log (Debug mode) | 524292 |
| Large tables with no-cache results | 3145731 |
You can connect to the MySQL server using SQLDriverConnect, by
specifying the DRIVER name field. Here are
the connection strings for MyODBC using DSN-Less connections:
For MyODBC 2.50:
ConnectionString = "DRIVER={MySQL};\
SERVER=localhost;\
DATABASE=test;\
USER=venu;\
PASSWORD=venu;\
OPTION=3;"For MyODBC 3.51:
ConnectionString = "DRIVER={MySQL ODBC 3.51 Driver};\
SERVER=localhost;\
DATABASE=test;\
USER=venu;\
PASSWORD=venu;\
OPTION=3;"If your programming language converts backslash followed by whitespace to a space, it is preferable to specify the connection string as a single long string, or to use a concatenation of multiple strings that does not add spaces in between. For example:
ConnectionString = "DRIVER={MySQL ODBC 3.51 Driver};"
"SERVER=localhost;"
"DATABASE=test;"
"USER=venu;"
"PASSWORD=venu;"
"OPTION=3;"Note. Note that on Mac OS X you may need to specify the full path to the MyODBC driver library.
Refer to the Section 23.1.3.5, “MyODBC Connection Parameters”, for the list of connection parameters that can be supplied.
Connection pooling enables the ODBC driver to re-use existing connections to a given database from a pool of connections, instead of opening a new connection each time the database is accessed. By enabling connection pooling you can improve the overall performance of your application by lowering the time taken to open a connection to a database in the connection pool.
For more information about connection pooling: http://support.microsoft.com/default.aspx?scid=kb;EN-US;q169470.
If you encounter difficulties or problems with MyODBC, you
should start by making a log file from the ODBC
Manager and MyODBC. This is called
tracing, and is enabled through the ODBC
Manager. The procedure for this differs for Windows, Mac OS X
and Unix.
To enable the trace option on Windows:
The
Tracingtab of the ODBC Data Source Administrator dialog box enables you to configure the way ODBC function calls are traced.
When you activate tracing from the
Tracingtab, theDriver Managerlogs all ODBC function calls for all subsequently run applications.ODBC function calls from applications running before tracing is activated are not logged. ODBC function calls are recorded in a log file you specify.
Tracing ceases only after you click
Stop Tracing Now. Remember that while tracing is on, the log file continues to increase in size and that tracing affects the performance of all your ODBC applications.
To enable the trace option on Mac OS X 10.3 or later you
should use the Tracing tab within
ODBC
Administrator
.
Open the ODBC Administrator.
Select the
Tracingtab.
Select the
Enable Tracingcheckbox.Enter the location where you want to save the Tracing log. If you want to append information to an existing log file, click the button.
To enable the trace option on Mac OS X 10.2 (or earlier) or
Unix you must add the trace option to the
ODBC configuration:
On Unix, you need to explicitly set the
Traceoption in theODBC.INIfile.Set the tracing
ONorOFFby usingTraceFileandTraceparameters inodbc.inias shown below:TraceFile = /tmp/odbc.trace Trace = 1
TraceFilespecifies the name and full path of the trace file andTraceis set toONorOFF. You can also use1orYESforONand0orNOforOFF. If you are using ODBCConfig fromunixODBC, then follow the instructions for tracingunixODBCcalls at HOWTO-ODBCConfig.
To generate a MyODBC log, do the following:
Within Windows, enable the
Trace MyODBCoption flag in the MyODBC connect/configure screen. The log is written to fileC:\myodbc.log. If the trace option is not remembered when you are going back to the above screen, it means that you are not using themyodbcd.dlldriver, see xref linkend="myodbc-configuration-dsn-windows-problems"/>.On Mac OS X, Unix, or if you are using DSN-Less connection, then you need to supply
OPTION=4in the connection string or set the corresponding keyword/value pair in the DSN.Start your application and try to get it to fail. Then check the MyODBC trace file to find out what could be wrong.
If you need help determining what is wrong, see Section 23.1.7.1, “MyODBC Community Support”.
Once you have configured a DSN to provide access to a database, how you access and use that connection is dependent on the application or programming language. As ODBC is a standardized interface, any application or language that supports ODBC can use the DSN and connect to the configured database.
Interacting with a MySQL server from an applications using the MyODBC typically involves the following operations:
Configure the MyODBC DSN
Connect to MySQL server
Initialization operations
Execute SQL statements
Retrieve results
Perform Transactions
Disconnect from the server
Most applications use some variation of these steps. The basic application steps are shown in the following diagram:
A typical installation situation where you would install MyODBC is when you want to access a database on a Linux or Unix host from a Windows machine.
As an example of the process required to set up access between
two machines, the steps below take you through the basic steps.
These instructions assume that you want to connect to system
ALPHA from system BETA with a username and password of
myuser and mypassword.
On system ALPHA (the MySQL server) follow these steps:
Start the MySQL server.
Use
GRANTto set up an account with a username ofmyuserthat can connect from system BETA using a password ofmyuserto the databasetest:GRANT ALL ON test.* to 'myuser'@'BETA' IDENTIFIED BY 'mypassword';
For more information about MySQL privileges, refer to Section 5.9, “MySQL User Account Management”.
On system BETA (the MyODBC client), follow these steps:
Configure a MyODBC DSN using parameters that match the server, database and authentication information that you have just configured on system ALPHA.
Parameter Value Comment DSN remote_test A name to identify the connection. SERVER ALPHA The address of the remote server. DATABASE test The name of the default database. USER myuser The username configured for access to this database. PASSWORD mypassword The password for myuser.Using an ODBC-capable application, such as Microsoft Office, connect to the MySQL server using the DSN you have just created. If the connection fails, use tracing to examine the connection process. See Section 23.1.3.8, “Getting an ODBC Trace File”, for more information.
Once you have configured your MyODBC DSN, you can access your MySQL database through any application that supports the ODBC interface, including programming languages and third-party applications. This section contains guides and help on using MyODBC with various ODBC-compatible tools and applications, including Microsoft Word, Microsoft Excel and Adobe/Macromedia ColdFusion.
MyODBC has been tested with the following applications:
| Publisher | Application | Notes |
| Adobe | ColdFusion | Formerly Macromedia ColdFusion |
| Borland | C++ Builder | |
| Builder 4 | ||
| Delphi | ||
| Business Objects | Crystal Reports | |
| Claris | Filemaker Pro | |
| Corel | Paradox | |
| Computer Associates | Visual Objects | Also known as CAVO |
| AllFusion ERwin Data Modeler | ||
| Gupta | Team Developer | Previously known as Centura Team Developer; Gupta SQL/Windows |
| Gensym | G2-ODBC Bridge | |
| Inline | iHTML | |
| Lotus | Notes | Versions 4.5 and 4.6 |
| Microsoft | Access | |
| Excel | ||
| Visio Enterprise | ||
| Visual C++ | ||
| Visual Basic | ||
| ODBC.NET | Using C#, Visual Basic, C++ | |
| FoxPro | ||
| Visual Interdev | ||
| OpenOffice.org | OpenOffice.org | |
| Perl | DBD::ODBC | |
| Pervasive Software | DataJunction | |
| Sambar Technologies | Sambar Server | |
| SPSS | SPSS | |
| SoftVelocity | Clarion | |
| SQLExpress | SQLExpress for Xbase++ | |
| Sun | StarOffice | |
| SunSystems | Vision | |
| Sybase | PowerBuilder | |
| PowerDesigner | ||
| theKompany.com | Data Architect |
If you know of any other applications that work with MyODBC,
please send mail to <myodbc@lists.mysql.com>
about them.
You can use Microsoft Word and Microsoft Excel to access information from a MySQL database using MyODBC. Within Microsoft Word, this facility is most useful when importing data for mailmerge, or for tables and data to be included in reports. Within Microsoft Excel, you can execute queries on your MySQL server and import the data directly into an Excel Worksheet, presenting the data as a series of rows and columns.
With both applications, data is accessed and imported into the application using Microsoft Query , which enables you to execute a query though an ODBC source. You use Microsoft Query to build the SQL statement to be executed, selecting the tables, fields, selection criteria and sort order. For example, to insert information from a table in the World test database into an Excel spreadsheet, using the DSN samples shown in Section 23.1.3, “MyODBC Configuration”:
Create a new Worksheet.
From the
Datamenu, chooseImport External Data, and then selectNew Database Query.Microsoft Query will start. First, you need to choose the data source, by selecting an existing Data Source Name.
Within the
Query Wizard, you must choose the columns that you want to import. The list of tables available to the user configured through the DSN is shown on the left, the columns that will be added to your query are shown on the right. The columns you choose are equivalent to those in the first section of aSELECTquery. Click to continue.
You can filter rows from the query (the equivalent of a
WHEREclause) using theFilter Datadialog. Click to continue.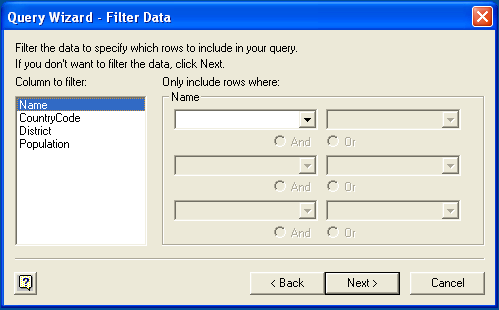
Select an (optional) sort order for the data. This is equivalent to using a
ORDER BYclause in your SQL query. You can select up to three fields for sorting the information returned by the query. Click to continue.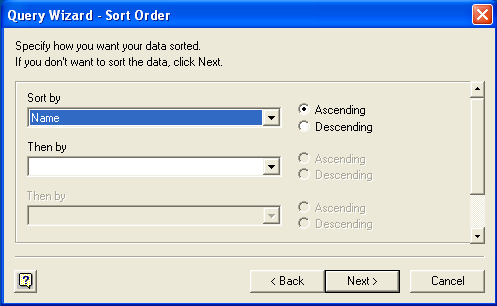
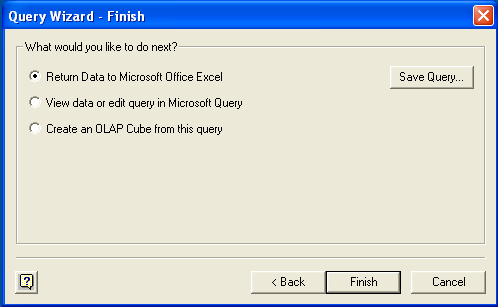
Select the destination for your query. You can select to return the data Microsoft Excel, where you can choose a worksheet and cell where the data will be inserted; you can continue to view the query and results within Microsoft Query, where you can edit the SQL query and further filter and sort the information returned; or you can create an OLAP Cube from the query, which can then be used directly within Microsoft Excel. Click .
The same process can be used to import data into a Word document, where the data will be inserted as a table. This can be used for mail merge purposes (where the field data is read from a Word table), or where you want to include data and reports within a report or other document.
You can use MySQL database with Microsoft Access using MyODBC. The MySQL database can be used as an import source, an export source, or as a linked table for direct use within an Access application, so you can use Access as the front-end interface to a MySQL database.
To export a table of data from an Access database to MySQL, follow these instructions:
When you open an Access database or an Access project, a Database window appears. It displays shortcuts for creating new database objects and opening existing objects.
Click the name of the
tableorqueryyou want to export, and then in theFilemenu, selectExport.In the
Export Object Typedialog box, in theObject nameToSave As Typebox, selectODBC Databases ()as shown here: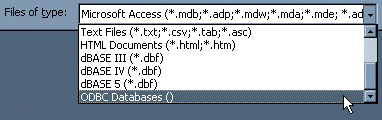
In the
Exportdialog box, enter a name for the file (or use the suggested name), and then selectOK.The Select Data Source dialog box is displayed; it lists the defined data sources for any ODBC drivers installed on your computer. Click either the File Data Source or Machine Data Source tab, and then double-click the MyODBC or MyODBC 3.51 data source that you want to export to. To define a new data source for MyODBC, please Section 23.1.3.2, “Configuring a MyODBC DSN on Windows”.
Microsoft Access connects to the MySQL Server through this data source and exports new tables and or data.
To import or link a table or tables from MySQL to Access, follow these instructions:
Open a database, or switch to the Database window for the open database.
To import tables, on the
Filemenu, point toGet External Data, and then clickImport. To link tables, on the File menu, point toGet External Data, and then clickLink Tables.In the
Import(orLink) dialog box, in the Files Of Type box, selectODBC Databases (). The Select Data Source dialog box lists the defined data sources The Select Data Source dialog box is displayed; it lists the defined data source names.If the ODBC data source that you selected requires you to log on, enter your login ID and password (additional information might also be required), and then click
OK.Microsoft Access connects to the MySQL server through
ODBC data sourceand displays the list of tables that you canimportorlink.Click each table that you want to
importorlink, and then clickOK. If you're linking a table and it doesn't have an index that uniquely identifies each record, Microsoft Access displays a list of the fields in the linked table. Click a field or a combination of fields that uniquely identifies each record, and then clickOK.
Use the following procedure to view or to refresh links when the structure or location of a linked table has changed. The Linked Table Manager lists the paths to all currently linked tables.
To view or refresh links:
Open the database that contains links to tables.
On the
Toolsmenu, point toAdd-ins(Database Utilitiesin Access 2000 or newer), and then clickLinked Table Manager.Select the check box for the tables whose links you want to refresh.
Click OK to refresh the links.
Microsoft Access confirms a successful refresh or, if the
table wasn't found, displays the Select New
Location of <table name> dialog box in which
you can specify its the table's new location. If several
selected tables have moved to the new location that you
specify, the Linked Table Manager searches that location for
all selected tables, and updates all links in one step.
To change the path for a set of linked tables:
Open the database that contains links to tables.
On the
Toolsmenu, point toAdd-ins(Database Utilitiesin Access 2000 or newer), and then clickLinked Table Manager.Select the
Always Prompt For A New Locationcheck box.Select the check box for the tables whose links you want to change, and then click
OK.In the
Select New Location of<table name> dialog box, specify the new location, clickOpen, and then clickOK.
With a suitable ODBC Manager and the my MyODBC driver installed, any programming language or environment that can support ODBC should be able to connect to a MySQL database through MyODBC.
This includes, but is certainly not limited to, Microsoft support languages (including Visual Basic, C# and interfaces such as ODBC.NET), Perl (through the DBI module, and the DBD::ODBC driver).
This section contains simple examples of the use of MySQL ODBC 3.51 Driver with ADO, DAO and RDO.
The following ADO (ActiveX Data Objects) example creates a
table my_ado and demonstrates the use of
rs.addNew, rs.delete,
and rs.update.
Private Sub myodbc_ado_Click()
Dim conn As ADODB.Connection
Dim rs As ADODB.Recordset
Dim fld As ADODB.Field
Dim sql As String
'connect to MySQL server using MySQL ODBC 3.51 Driver
Set conn = New ADODB.Connection
conn.ConnectionString = "DRIVER={MySQL ODBC 3.51 Driver};"_
& "SERVER=localhost;"_
& " DATABASE=test;"_
& "UID=venu;PWD=venu; OPTION=3"
conn.Open
'create table
conn.Execute "DROP TABLE IF EXISTS my_ado"
conn.Execute "CREATE TABLE my_ado(id int not null primary key, name varchar(20)," _
& "txt text, dt date, tm time, ts timestamp)"
'direct insert
conn.Execute "INSERT INTO my_ado(id,name,txt) values(1,100,'venu')"
conn.Execute "INSERT INTO my_ado(id,name,txt) values(2,200,'MySQL')"
conn.Execute "INSERT INTO my_ado(id,name,txt) values(3,300,'Delete')"
Set rs = New ADODB.Recordset
rs.CursorLocation = adUseServer
'fetch the initial table ..
rs.Open "SELECT * FROM my_ado", conn
Debug.Print rs.RecordCount
rs.MoveFirst
Debug.Print String(50, "-") & "Initial my_ado Result Set " & String(50, "-")
For Each fld In rs.Fields
Debug.Print fld.Name,
Next
Debug.Print
Do Until rs.EOF
For Each fld In rs.Fields
Debug.Print fld.Value,
Next
rs.MoveNext
Debug.Print
Loop
rs.Close
'rs insert
rs.Open "select * from my_ado", conn, adOpenDynamic, adLockOptimistic
rs.AddNew
rs!Name = "Monty"
rs!txt = "Insert row"
rs.Update
rs.Close
'rs update
rs.Open "SELECT * FROM my_ado"
rs!Name = "update"
rs!txt = "updated-row"
rs.Update
rs.Close
'rs update second time..
rs.Open "SELECT * FROM my_ado"
rs!Name = "update"
rs!txt = "updated-second-time"
rs.Update
rs.Close
'rs delete
rs.Open "SELECT * FROM my_ado"
rs.MoveNext
rs.MoveNext
rs.Delete
rs.Close
'fetch the updated table ..
rs.Open "SELECT * FROM my_ado", conn
Debug.Print rs.RecordCount
rs.MoveFirst
Debug.Print String(50, "-") & "Updated my_ado Result Set " & String(50, "-")
For Each fld In rs.Fields
Debug.Print fld.Name,
Next
Debug.Print
Do Until rs.EOF
For Each fld In rs.Fields
Debug.Print fld.Value,
Next
rs.MoveNext
Debug.Print
Loop
rs.Close
conn.Close
End Sub
The following DAO (Data Access Objects) example creates a
table my_dao and demonstrates the use of
rs.addNew, rs.update,
and result set scrolling.
Private Sub myodbc_dao_Click()
Dim ws As Workspace
Dim conn As Connection
Dim queryDef As queryDef
Dim str As String
'connect to MySQL using MySQL ODBC 3.51 Driver
Set ws = DBEngine.CreateWorkspace("", "venu", "venu", dbUseODBC)
str = "odbc;DRIVER={MySQL ODBC 3.51 Driver};"_
& "SERVER=localhost;"_
& " DATABASE=test;"_
& "UID=venu;PWD=venu; OPTION=3"
Set conn = ws.OpenConnection("test", dbDriverNoPrompt, False, str)
'Create table my_dao
Set queryDef = conn.CreateQueryDef("", "drop table if exists my_dao")
queryDef.Execute
Set queryDef = conn.CreateQueryDef("", "create table my_dao(Id INT AUTO_INCREMENT PRIMARY KEY, " _
& "Ts TIMESTAMP(14) NOT NULL, Name varchar(20), Id2 INT)")
queryDef.Execute
'Insert new records using rs.addNew
Set rs = conn.OpenRecordset("my_dao")
Dim i As Integer
For i = 10 To 15
rs.AddNew
rs!Name = "insert record" & i
rs!Id2 = i
rs.Update
Next i
rs.Close
'rs update..
Set rs = conn.OpenRecordset("my_dao")
rs.Edit
rs!Name = "updated-string"
rs.Update
rs.Close
'fetch the table back...
Set rs = conn.OpenRecordset("my_dao", dbOpenDynamic)
str = "Results:"
rs.MoveFirst
While Not rs.EOF
str = " " & rs!Id & " , " & rs!Name & ", " & rs!Ts & ", " & rs!Id2
Debug.Print "DATA:" & str
rs.MoveNext
Wend
'rs Scrolling
rs.MoveFirst
str = " FIRST ROW: " & rs!Id & " , " & rs!Name & ", " & rs!Ts & ", " & rs!Id2
Debug.Print str
rs.MoveLast
str = " LAST ROW: " & rs!Id & " , " & rs!Name & ", " & rs!Ts & ", " & rs!Id2
Debug.Print str
rs.MovePrevious
str = " LAST-1 ROW: " & rs!Id & " , " & rs!Name & ", " & rs!Ts & ", " & rs!Id2
Debug.Print str
'free all resources
rs.Close
queryDef.Close
conn.Close
ws.Close
End Sub
The following RDO (Remote Data Objects) example creates a
table my_rdo and demonstrates the use of
rs.addNew and
rs.update.
Dim rs As rdoResultset
Dim cn As New rdoConnection
Dim cl As rdoColumn
Dim SQL As String
'cn.Connect = "DSN=test;"
cn.Connect = "DRIVER={MySQL ODBC 3.51 Driver};"_
& "SERVER=localhost;"_
& " DATABASE=test;"_
& "UID=venu;PWD=venu; OPTION=3"
cn.CursorDriver = rdUseOdbc
cn.EstablishConnection rdDriverPrompt
'drop table my_rdo
SQL = "drop table if exists my_rdo"
cn.Execute SQL, rdExecDirect
'create table my_rdo
SQL = "create table my_rdo(id int, name varchar(20))"
cn.Execute SQL, rdExecDirect
'insert - direct
SQL = "insert into my_rdo values (100,'venu')"
cn.Execute SQL, rdExecDirect
SQL = "insert into my_rdo values (200,'MySQL')"
cn.Execute SQL, rdExecDirect
'rs insert
SQL = "select * from my_rdo"
Set rs = cn.OpenResultset(SQL, rdOpenStatic, rdConcurRowVer, rdExecDirect)
rs.AddNew
rs!id = 300
rs!Name = "Insert1"
rs.Update
rs.Close
'rs insert
SQL = "select * from my_rdo"
Set rs = cn.OpenResultset(SQL, rdOpenStatic, rdConcurRowVer, rdExecDirect)
rs.AddNew
rs!id = 400
rs!Name = "Insert 2"
rs.Update
rs.Close
'rs update
SQL = "select * from my_rdo"
Set rs = cn.OpenResultset(SQL, rdOpenStatic, rdConcurRowVer, rdExecDirect)
rs.Edit
rs!id = 999
rs!Name = "updated"
rs.Update
rs.Close
'fetch back...
SQL = "select * from my_rdo"
Set rs = cn.OpenResultset(SQL, rdOpenStatic, rdConcurRowVer, rdExecDirect)
Do Until rs.EOF
For Each cl In rs.rdoColumns
Debug.Print cl.Value,
Next
rs.MoveNext
Debug.Print
Loop
Debug.Print "Row count="; rs.RowCount
'close
rs.Close
cn.Close
End SubThis section contains simple examples that demonstrate the use of MyODBC drivers with ODBC.NET.
The following sample creates a table
my_odbc_net and demonstrates its use in
C#.
/**
* @sample : mycon.cs
* @purpose : Demo sample for ODBC.NET using MyODBC
* @author : Venu, <myodbc@lists.mysql.com>
*
* (C) Copyright MySQL AB, 1995-2006
*
**/
/* build command
*
* csc /t:exe
* /out:mycon.exe mycon.cs
* /r:Microsoft.Data.Odbc.dll
*/
using Console = System.Console;
using Microsoft.Data.Odbc;
namespace myodbc3
{
class mycon
{
static void Main(string[] args)
{
try
{
//Connection string for MyODBC 2.50
/*string MyConString = "DRIVER={MySQL};" +
"SERVER=localhost;" +
"DATABASE=test;" +
"UID=venu;" +
"PASSWORD=venu;" +
"OPTION=3";
*/
//Connection string for MyODBC 3.51
string MyConString = "DRIVER={MySQL ODBC 3.51 Driver};" +
"SERVER=localhost;" +
"DATABASE=test;" +
"UID=venu;" +
"PASSWORD=venu;" +
"OPTION=3";
//Connect to MySQL using MyODBC
OdbcConnection MyConnection = new OdbcConnection(MyConString);
MyConnection.Open();
Console.WriteLine("\n !!! success, connected successfully !!!\n");
//Display connection information
Console.WriteLine("Connection Information:");
Console.WriteLine("\tConnection String:" +
MyConnection.ConnectionString);
Console.WriteLine("\tConnection Timeout:" +
MyConnection.ConnectionTimeout);
Console.WriteLine("\tDatabase:" +
MyConnection.Database);
Console.WriteLine("\tDataSource:" +
MyConnection.DataSource);
Console.WriteLine("\tDriver:" +
MyConnection.Driver);
Console.WriteLine("\tServerVersion:" +
MyConnection.ServerVersion);
//Create a sample table
OdbcCommand MyCommand =
new OdbcCommand("DROP TABLE IF EXISTS my_odbc_net",
MyConnection);
MyCommand.ExecuteNonQuery();
MyCommand.CommandText =
"CREATE TABLE my_odbc_net(id int, name varchar(20), idb bigint)";
MyCommand.ExecuteNonQuery();
//Insert
MyCommand.CommandText =
"INSERT INTO my_odbc_net VALUES(10,'venu', 300)";
Console.WriteLine("INSERT, Total rows affected:" +
MyCommand.ExecuteNonQuery());;
//Insert
MyCommand.CommandText =
"INSERT INTO my_odbc_net VALUES(20,'mysql',400)";
Console.WriteLine("INSERT, Total rows affected:" +
MyCommand.ExecuteNonQuery());
//Insert
MyCommand.CommandText =
"INSERT INTO my_odbc_net VALUES(20,'mysql',500)";
Console.WriteLine("INSERT, Total rows affected:" +
MyCommand.ExecuteNonQuery());
//Update
MyCommand.CommandText =
"UPDATE my_odbc_net SET id=999 WHERE id=20";
Console.WriteLine("Update, Total rows affected:" +
MyCommand.ExecuteNonQuery());
//COUNT(*)
MyCommand.CommandText =
"SELECT COUNT(*) as TRows FROM my_odbc_net";
Console.WriteLine("Total Rows:" +
MyCommand.ExecuteScalar());
//Fetch
MyCommand.CommandText = "SELECT * FROM my_odbc_net";
OdbcDataReader MyDataReader;
MyDataReader = MyCommand.ExecuteReader();
while (MyDataReader.Read())
{
if(string.Compare(MyConnection.Driver,"myodbc3.dll") == 0) {
//Supported only by MyODBC 3.51
Console.WriteLine("Data:" + MyDataReader.GetInt32(0) + " " +
MyDataReader.GetString(1) + " " +
MyDataReader.GetInt64(2));
}
else {
//BIGINTs not supported by MyODBC
Console.WriteLine("Data:" + MyDataReader.GetInt32(0) + " " +
MyDataReader.GetString(1) + " " +
MyDataReader.GetInt32(2));
}
}
//Close all resources
MyDataReader.Close();
MyConnection.Close();
}
catch (OdbcException MyOdbcException) //Catch any ODBC exception ..
{
for (int i=0; i < MyOdbcException.Errors.Count; i++)
{
Console.Write("ERROR #" + i + "\n" +
"Message: " +
MyOdbcException.Errors[i].Message + "\n" +
"Native: " +
MyOdbcException.Errors[i].NativeError.ToString() + "\n" +
"Source: " +
MyOdbcException.Errors[i].Source + "\n" +
"SQL: " +
MyOdbcException.Errors[i].SQLState + "\n");
}
}
}
}
}
The following sample creates a table
my_vb_net and demonstrates the use in VB.
' @sample : myvb.vb
' @purpose : Demo sample for ODBC.NET using MyODBC
' @author : Venu, <myodbc@lists.mysql.com>
'
' (C) Copyright MySQL AB, 1995-2006
'
'
'
' build command
'
' vbc /target:exe
' /out:myvb.exe
' /r:Microsoft.Data.Odbc.dll
' /r:System.dll
' /r:System.Data.dll
'
Imports Microsoft.Data.Odbc
Imports System
Module myvb
Sub Main()
Try
'MyODBC 3.51 connection string
Dim MyConString As String = "DRIVER={MySQL ODBC 3.51 Driver};" & _
"SERVER=localhost;" & _
"DATABASE=test;" & _
"UID=venu;" & _
"PASSWORD=venu;" & _
"OPTION=3;"
'Connection
Dim MyConnection As New OdbcConnection(MyConString)
MyConnection.Open()
Console.WriteLine("Connection State::" & MyConnection.State.ToString)
'Drop
Console.WriteLine("Dropping table")
Dim MyCommand As New OdbcCommand()
MyCommand.Connection = MyConnection
MyCommand.CommandText = "DROP TABLE IF EXISTS my_vb_net"
MyCommand.ExecuteNonQuery()
'Create
Console.WriteLine("Creating....")
MyCommand.CommandText = "CREATE TABLE my_vb_net(id int, name varchar(30))"
MyCommand.ExecuteNonQuery()
'Insert
MyCommand.CommandText = "INSERT INTO my_vb_net VALUES(10,'venu')"
Console.WriteLine("INSERT, Total rows affected:" & _
MyCommand.ExecuteNonQuery())
'Insert
MyCommand.CommandText = "INSERT INTO my_vb_net VALUES(20,'mysql')"
Console.WriteLine("INSERT, Total rows affected:" & _
MyCommand.ExecuteNonQuery())
'Insert
MyCommand.CommandText = "INSERT INTO my_vb_net VALUES(20,'mysql')"
Console.WriteLine("INSERT, Total rows affected:" & _
MyCommand.ExecuteNonQuery())
'Insert
MyCommand.CommandText = "INSERT INTO my_vb_net(id) VALUES(30)"
Console.WriteLine("INSERT, Total rows affected:" & _
MyCommand.ExecuteNonQuery())
'Update
MyCommand.CommandText = "UPDATE my_vb_net SET id=999 WHERE id=20"
Console.WriteLine("Update, Total rows affected:" & _
MyCommand.ExecuteNonQuery())
'COUNT(*)
MyCommand.CommandText = "SELECT COUNT(*) as TRows FROM my_vb_net"
Console.WriteLine("Total Rows:" & MyCommand.ExecuteScalar())
'Select
Console.WriteLine("Select * FROM my_vb_net")
MyCommand.CommandText = "SELECT * FROM my_vb_net"
Dim MyDataReader As OdbcDataReader
MyDataReader = MyCommand.ExecuteReader
While MyDataReader.Read
If MyDataReader("name") Is DBNull.Value Then
Console.WriteLine("id = " & _
CStr(MyDataReader("id")) & " name = " & _
"NULL")
Else
Console.WriteLine("id = " & _
CStr(MyDataReader("id")) & " name = " & _
CStr(MyDataReader("name")))
End If
End While
'Catch ODBC Exception
Catch MyOdbcException As OdbcException
Dim i As Integer
Console.WriteLine(MyOdbcException.ToString)
'Catch program exception
Catch MyException As Exception
Console.WriteLine(MyException.ToString)
End Try
End SubThis section provides reference material for the MyODBC API, showing supported functions and methods, supported MySQL column types and the corresponding native type in MyODBC, and the error codes returned by MyODBC when a fault occurs.
This section summarizes ODBC routines, categorized by functionality.
For the complete ODBC API reference, please refer to the ODBC Programer's Reference at http://msdn.microsoft.com/library/en-us/odbc/htm/odbcabout_this_manual.asp.
An application can call SQLGetInfo function
to obtain conformance information about MyODBC. To obtain
information about support for a specific function in the driver,
an application can call SQLGetFunctions.
Note: For backward compatibility, the MyODBC 3.51 driver supports all deprecated functions.
The following tables list MyODBC API calls grouped by task:
Connecting to a data source:
| MyODBC | ||||
| Function name | 2.50 | 3.51 | Standard | Purpose |
SQLAllocHandle | No | Yes | ISO 92 | Obtains an environment, connection, statement, or descriptor handle. |
SQLConnect | Yes | Yes | ISO 92 | Connects to a specific driver by data source name, user ID, and password. |
SQLDriverConnect | Yes | Yes | ODBC | Connects to a specific driver by connection string or requests that the Driver Manager and driver display connection dialog boxes for the user. |
SQLAllocEnv | Yes | Yes | Deprecated | Obtains an environment handle allocated from driver. |
SQLAllocConnect | Yes | Yes | Deprecated | Obtains a connection handle |
Obtaining information about a driver and data source:
| MyODBC | ||||
| Function name | 2.50 | 3.51 | Standard | Purpose |
SQLDataSources | No | No | ISO 92 | Returns the list of available data sources, handled by the Driver Manager |
SQLDrivers | No | No | ODBC | Returns the list of installed drivers and their attributes, handles by Driver Manager |
SQLGetInfo | Yes | Yes | ISO 92 | Returns information about a specific driver and data source. |
SQLGetFunctions | Yes | Yes | ISO 92 | Returns supported driver functions. |
SQLGetTypeInfo | Yes | Yes | ISO 92 | Returns information about supported data types. |
Setting and retrieving driver attributes:
| MyODBC | ||||
| Function name | 2.50 | 3.51 | Standard | Purpose |
SQLSetConnectAttr | No | Yes | ISO 92 | Sets a connection attribute. |
SQLGetConnectAttr | No | Yes | ISO 92 | Returns the value of a connection attribute. |
SQLSetConnectOption | Yes | Yes | Deprecated | Sets a connection option |
SQLGetConnectOption | Yes | Yes | Deprecated | Returns the value of a connection option |
SQLSetEnvAttr | No | Yes | ISO 92 | Sets an environment attribute. |
SQLGetEnvAttr | No | Yes | ISO 92 | Returns the value of an environment attribute. |
SQLSetStmtAttr | No | Yes | ISO 92 | Sets a statement attribute. |
SQLGetStmtAttr | No | Yes | ISO 92 | Returns the value of a statement attribute. |
SQLSetStmtOption | Yes | Yes | Deprecated | Sets a statement option |
SQLGetStmtOption | Yes | Yes | Deprecated | Returns the value of a statement option |
Preparing SQL requests:
| MyODBC | ||||
| Function name | 2.50 | 3.51 | Standard | Purpose |
SQLAllocStmt | Yes | Yes | Deprecated | Allocates a statement handle |
SQLPrepare | Yes | Yes | ISO 92 | Prepares an SQL statement for later execution. |
SQLBindParameter | Yes | Yes | ODBC | Assigns storage for a parameter in an SQL statement. |
SQLGetCursorName | Yes | Yes | ISO 92 | Returns the cursor name associated with a statement handle. |
SQLSetCursorName | Yes | Yes | ISO 92 | Specifies a cursor name. |
SQLSetScrollOptions | Yes | Yes | ODBC | Sets options that control cursor behavior. |
Submitting requests:
| MyODBC | ||||
| Function name | 2.50 | 3.51 | Standard | Purpose |
SQLExecute | Yes | Yes | ISO 92 | Executes a prepared statement. |
SQLExecDirect | Yes | Yes | ISO 92 | Executes a statement |
SQLNativeSql | Yes | Yes | ODBC | Returns the text of an SQL statement as translated by the driver. |
SQLDescribeParam | Yes | Yes | ODBC | Returns the description for a specific parameter in a statement. |
SQLNumParams | Yes | Yes | ISO 92 | Returns the number of parameters in a statement. |
SQLParamData | Yes | Yes | ISO 92 | Used in conjunction with SQLPutData to supply
parameter data at execution time. (Useful for long data
values.) |
SQLPutData | Yes | Yes | ISO 92 | Sends part or all of a data value for a parameter. (Useful for long data values.) |
Retrieving results and information about results:
| MyODBC | ||||
| Function name | 2.50 | 3.51 | Standard | Purpose |
SQLRowCount | Yes | Yes | ISO 92 | Returns the number of rows affected by an insert, update, or delete request. |
SQLNumResultCols | Yes | Yes | ISO 92 | Returns the number of columns in the result set. |
SQLDescribeCol | Yes | Yes | ISO 92 | Describes a column in the result set. |
SQLColAttribute | No | Yes | ISO 92 | Describes attributes of a column in the result set. |
SQLColAttributes | Yes | Yes | Deprecated | Describes attributes of a column in the result set. |
SQLFetch | Yes | Yes | ISO 92 | Returns multiple result rows. |
SQLFetchScroll | No | Yes | ISO 92 | Returns scrollable result rows. |
SQLExtendedFetch | Yes | Yes | Deprecated | Returns scrollable result rows. |
SQLSetPos | Yes | Yes | ODBC | Positions a cursor within a fetched block of data and allows an application to refresh data in the rowset or to update or delete data in the result set. |
SQLBulkOperations | No | Yes | ODBC | Performs bulk insertions and bulk bookmark operations, including update, delete, and fetch by bookmark. |
Retrieving error or diagnostic information:
| MyODBC | ||||
| Function name | 2.50 | 3.51 | Standard | Purpose |
SQLError | Yes | Yes | Deprecated | Returns additional error or status information |
SQLGetDiagField | Yes | Yes | ISO 92 | Returns additional diagnostic information (a single field of the diagnostic data structure). |
SQLGetDiagRec | Yes | Yes | ISO 92 | Returns additional diagnostic information (multiple fields of the diagnostic data structure). |
Obtaining information about the data source's system tables (catalog functions) item:
| MyODBC | ||||
| Function name | 2.50 | 3.51 | Standard | Purpose |
SQLColumnPrivileges | Yes | Yes | ODBC | Returns a list of columns and associated privileges for one or more tables. |
SQLColumns | Yes | Yes | X/Open | Returns the list of column names in specified tables. |
SQLForeignKeys | Yes | Yes | ODBC | Returns a list of column names that make up foreign keys, if they exist for a specified table. |
SQLPrimaryKeys | Yes | Yes | ODBC | Returns the list of column names that make up the primary key for a table. |
SQLSpecialColumns | Yes | Yes | X/Open | Returns information about the optimal set of columns that uniquely identifies a row in a specified table, or the columns that are automatically updated when any value in the row is updated by a transaction. |
SQLStatistics | Yes | Yes | ISO 92 | Returns statistics about a single table and the list of indexes associated with the table. |
SQLTablePrivileges | Yes | Yes | ODBC | Returns a list of tables and the privileges associated with each table. |
SQLTables | Yes | Yes | X/Open | Returns the list of table names stored in a specific data source. |
Performing transactions:
| MyODBC | ||||
| Function name | 2.50 | 3.51 | Standard | Purpose |
SQLTransact | Yes | Yes | Deprecated | Commits or rolls back a transaction |
SQLEndTran | No | Yes | ISO 92 | Commits or rolls back a transaction. |
Terminating a statement:
| MyODBC | ||||
| Function name | 2.50 | 3.51 | Standard | Purpose |
SQLFreeStmt | Yes | Yes | ISO 92 | Ends statement processing, discards pending results, and, optionally, frees all resources associated with the statement handle. |
SQLCloseCursor | Yes | Yes | ISO 92 | Closes a cursor that has been opened on a statement handle. |
SQLCancel | Yes | Yes | ISO 92 | Cancels an SQL statement. |
Terminating a connection:
| MyODBC | ||||
| Function name | 2.50 | 3.51 | Standard | Purpose |
SQLDisconnect | Yes | Yes | ISO 92 | Closes the connection. |
SQLFreeHandle | No | Yes | ISO 92 | Releases an environment, connection, statement, or descriptor handle. |
SQLFreeConnect | Yes | Yes | Deprecated | Releases connection handle |
SQLFreeEnv | Yes | Yes | Deprecated | Releases an environment handle |
The following table illustrates how driver maps the server data types to default SQL and C data types:
| Native Value | SQL Type | C Type |
bit | SQL_BIT | SQL_C_BIT |
tinyint | SQL_TINYINT | SQL_C_STINYINT |
tinyint unsigned | SQL_TINYINT | SQL_C_UTINYINT |
bigint | SQL_BIGINT | SQL_C_SBIGINT |
bigint unsigned | SQL_BIGINT | SQL_C_UBIGINT |
long varbinary | SQL_LONGVARBINARY | SQL_C_BINARY |
blob | SQL_LONGVARBINARY | SQL_C_BINARY |
longblob | SQL_LONGVARBINARY | SQL_C_BINARY |
tinyblob | SQL_LONGVARBINARY | SQL_C_BINARY |
mediumblob | SQL_LONGVARBINARY | SQL_C_BINARY |
long varchar | SQL_LONGVARCHAR | SQL_C_CHAR |
text | SQL_LONGVARCHAR | SQL_C_CHAR |
mediumtext | SQL_LONGVARCHAR | SQL_C_CHAR |
char | SQL_CHAR | SQL_C_CHAR |
numeric | SQL_NUMERIC | SQL_C_CHAR |
decimal | SQL_DECIMAL | SQL_C_CHAR |
integer | SQL_INTEGER | SQL_C_SLONG |
integer unsigned | SQL_INTEGER | SQL_C_ULONG |
int | SQL_INTEGER | SQL_C_SLONG |
int unsigned | SQL_INTEGER | SQL_C_ULONG |
mediumint | SQL_INTEGER | SQL_C_SLONG |
mediumint unsigned | SQL_INTEGER | SQL_C_ULONG |
smallint | SQL_SMALLINT | SQL_C_SSHORT |
smallint unsigned | SQL_SMALLINT | SQL_C_USHORT |
real | SQL_FLOAT | SQL_C_DOUBLE |
double | SQL_FLOAT | SQL_C_DOUBLE |
float | SQL_REAL | SQL_C_FLOAT |
double precision | SQL_DOUBLE | SQL_C_DOUBLE |
date | SQL_DATE | SQL_C_DATE |
time | SQL_TIME | SQL_C_TIME |
year | SQL_SMALLINT | SQL_C_SHORT |
datetime | SQL_TIMESTAMP | SQL_C_TIMESTAMP |
timestamp | SQL_TIMESTAMP | SQL_C_TIMESTAMP |
text | SQL_VARCHAR | SQL_C_CHAR |
varchar | SQL_VARCHAR | SQL_C_CHAR |
enum | SQL_VARCHAR | SQL_C_CHAR |
set | SQL_VARCHAR | SQL_C_CHAR |
bit | SQL_CHAR | SQL_C_CHAR |
bool | SQL_CHAR | SQL_C_CHAR |
The following tables lists the error codes returned by the driver apart from the server errors.
| Native Code | SQLSTATE 2 | SQLSTATE 3 | Error Message |
| 500 | 01000 | 01000 | General warning |
| 501 | 01004 | 01004 | String data, right truncated |
| 502 | 01S02 | 01S02 | Option value changed |
| 503 | 01S03 | 01S03 | No rows updated/deleted |
| 504 | 01S04 | 01S04 | More than one row updated/deleted |
| 505 | 01S06 | 01S06 | Attempt to fetch before the result set returned the first row set |
| 506 | 07001 | 07002 | SQLBindParameter not used for all parameters |
| 507 | 07005 | 07005 | Prepared statement not a cursor-specification |
| 508 | 07009 | 07009 | Invalid descriptor index |
| 509 | 08002 | 08002 | Connection name in use |
| 510 | 08003 | 08003 | Connection does not exist |
| 511 | 24000 | 24000 | Invalid cursor state |
| 512 | 25000 | 25000 | Invalid transaction state |
| 513 | 25S01 | 25S01 | Transaction state unknown |
| 514 | 34000 | 34000 | Invalid cursor name |
| 515 | S1000 | HY000 | General driver defined error |
| 516 | S1001 | HY001 | Memory allocation error |
| 517 | S1002 | HY002 | Invalid column number |
| 518 | S1003 | HY003 | Invalid application buffer type |
| 519 | S1004 | HY004 | Invalid SQL data type |
| 520 | S1009 | HY009 | Invalid use of null pointer |
| 521 | S1010 | HY010 | Function sequence error |
| 522 | S1011 | HY011 | Attribute can not be set now |
| 523 | S1012 | HY012 | Invalid transaction operation code |
| 524 | S1013 | HY013 | Memory management error |
| 525 | S1015 | HY015 | No cursor name available |
| 526 | S1024 | HY024 | Invalid attribute value |
| 527 | S1090 | HY090 | Invalid string or buffer length |
| 528 | S1091 | HY091 | Invalid descriptor field identifier |
| 529 | S1092 | HY092 | Invalid attribute/option identifier |
| 530 | S1093 | HY093 | Invalid parameter number |
| 531 | S1095 | HY095 | Function type out of range |
| 532 | S1106 | HY106 | Fetch type out of range |
| 533 | S1117 | HY117 | Row value out of range |
| 534 | S1109 | HY109 | Invalid cursor position |
| 535 | S1C00 | HYC00 | Optional feature not implemented |
| 0 | 21S01 | 21S01 | Column count does not match value count |
| 0 | 23000 | 23000 | Integrity constraint violation |
| 0 | 42000 | 42000 | Syntax error or access violation |
| 0 | 42S02 | 42S02 | Base table or view not found |
| 0 | 42S12 | 42S12 | Index not found |
| 0 | 42S21 | 42S21 | Column already exists |
| 0 | 42S22 | 42S22 | Column not found |
| 0 | 08S01 | 08S01 | Communication link failure |
Here are some common notes and tips for using MyODBC within different environments, applications and tools. The notes provided here are based on the experiences of MyODBC developers and users.
This section provides help with common queries and areas of functionality in MySQL and how to use them with MyODBC.
Obtaining the value of column that uses
AUTO_INCREMENT after an
INSERT statement can be achieved in a
number of different ways. To obtain the value immediately
after an INSERT, use a
SELECT query with the
LAST_INSERT_ID() function.
For example, using MyODBC you would execute two separate
statements, the INSERT statement and the
SELECT query to obtain the auto-increment
value.
INSERT INTO tbl (auto,text) VALUES(NULL,'text'); SELECT LAST_INSERT_ID();
If you do not require the value within your application, but
do require the value as part of another
INSERT, the entire process can be handled
by executing the following statements:
INSERT INTO tbl (auto,text) VALUES(NULL,'text'); INSERT INTO tbl2 (id,text) VALUES(LAST_INSERT_ID(),'text');
Certain ODBC applications (including Delphi and Access) may have trouble obtaining the auto-increment value using the previous examples. In this case, try the following statement as an alternative:
SELECT * FROM tbl WHERE auto IS NULL;
See Section 22.2.13.3, “How to Get the Unique ID for the Last Inserted Row”.
Support for the dynamic cursor is provided
in MyODBC 3.51, but dynamic cursors are not enabled by
default. You can enable this function within Windows by
selecting the Enable Dynamic Cursor
checkbox within the ODBC Data Source Administrator.
On other platforms, you can enable the dynamic cursor by
adding 32 to the OPTION
value when creating the DSN.
The MyODBC driver has been optimized to provide very fast performance. If you experience problems with the performance of MyODBC, or notice a large amount of disk activity for simple queries, there are a number of aspects you should check:
Ensure that
ODBC Tracingis not enabled. With tracing enabled, a lot of information is recorded in the tracing file by the ODBC Manager. You can check, and disable, tracing within Windows using the panel of the ODBC Data Source Administrator. Within Mac OS X, check the panel of ODBC Administrator. See Section 23.1.3.8, “Getting an ODBC Trace File”.Make sure you are using the standard version of the driver, and not the debug version. The debug version includes additional checks and reporting measures.
Disable the MyODBC driver trace and query logs. These options are enabled for each DSN, so make sure to examine only the DSN that you are using in your application. Within Windows, you can disable the MyODBC and query logs by modifying the DSN configuration. Within Mac OS X and Unix, ensure that the driver trace (option value 4) and query logging (option value 524288) are not enabled.
For more information on how to set the query timeout on Microsoft Windows when executing queries through an ODBC connection, read the Microsoft knowledgebase document at http://support.microsoft.com/default.aspx?scid=kb%3Ben-us%3B153756.
Most programs should work with MyODBC, but for each of those listed here, there are specific notes and tips to improve or enhance the way you work with MyODBC and these applications.
With all applications you should ensure that you are using the latest MyODBC drivers, ODBC Manager and any supporting libraries and interfaces used by your application. For example, on Windows, using the latest version of Microsoft Data Access Components (MDAC) will improve the compatibility with ODBC in general, and with the MyODBC driver.
The majority of Microsoft applications have been tested with MyODBC, including Microsoft Office, Microsoft Access and the various programming languages supported within ASP and Microsoft Visual Studio.
If you have problem with MyODBC and your program also works with OLEDB, you should try the OLEDB driver.
To improve the integration between Microsoft Access and MySQL through MyODBC:
For all versions of Access, you should enable the MyODBC
Return matching rowsoption. For Access 2.0, you should additionally enable theSimulate ODBC 1.0option.You should have a
TIMESTAMPcolumn in all tables that you want to be able to update. For maximum portability, don't use a length specification in the column declaration (which is unsupported within MySQL in versions earlier than 4.1).You should have a primary key in each MySQL table you want to use with Access. If not, new or updated rows may show up as
#DELETED#.Use only
DOUBLEfloat fields. Access fails when comparing with single-precision floats. The symptom usually is that new or updated rows may show up as#DELETED#or that you can't find or update rows.If you are using MyODBC to link to a table that has a
BIGINTcolumn, the results are displayed as#DELETED#. The work around solution is:Have one more dummy column with
TIMESTAMPas the data type.Select the
Change BIGINT columns to INToption in the connection dialog in ODBC DSN Administrator.Delete the table link from Access and re-create it.
Old records may still display as
#DELETED#, but newly added/updated records are displayed properly.If you still get the error
Another user has changed your dataafter adding aTIMESTAMPcolumn, the following trick may help you:Don't use a
tabledata sheet view. Instead, create a form with the fields you want, and use thatformdata sheet view. You should set theDefaultValueproperty for theTIMESTAMPcolumn toNOW(). It may be a good idea to hide theTIMESTAMPcolumn from view so your users are not confused.In some cases, Access may generate SQL statements that MySQL can't understand. You can fix this by selecting
"Query|SQLSpecific|Pass-Through"from the Access menu.On Windows NT, Access reports
BLOBcolumns asOLE OBJECTS. If you want to haveMEMOcolumns instead, you should changeBLOBcolumns toTEXTwithALTER TABLE.Access can't always handle the MySQL
DATEcolumn properly. If you have a problem with these, change the columns toDATETIME.If you have in Access a column defined as
BYTE, Access tries to export this asTINYINTinstead ofTINYINT UNSIGNED. This gives you problems if you have values larger than 127 in the column.If you have very large (long) tables in Access, it might take a very long time to open them. Or you might run low on virtual memory and eventually get an
ODBC Query Failederror and the table cannot open. To deal with this, select the following options:Return Matching Rows (2)
Allow BIG Results (8).
These add up to a value of 10 (
OPTION=10).
Some external articles and tips that may be useful when using Access, ODBC and MyODBC:
Optimizing Access ODBC Applications
For a list of tools that can be used with Access and ODBC data sources, refer to converters section for list of available tools.
If you have problems importing data into Microsoft Excel, particularly numerical, date, and time values, this is probably because of a bug in Excel, where the column type of the source data is used to determine the data type when that data is inserted into a cell within the worksheet. The result is that Excel incorrectly identifies the content and this affects both the display format and the data when it is used within calculations.
To address this issue, use the CONCAT()
function in your queries. The use of
CONCAT() forces Excel to treat the value
as a string, which Excel will then parse and usually
correctly identify the embedded information.
However, even with this option, some data may be incorrectly
formatted, even though the source data remains unchanged.
Use the Format Cells option within Excel
to change the format of the displayed information.
To be able to update a table, you must define a primary key for the table.
Visual Basic with ADO can't handle big integers. This means
that some queries like SHOW PROCESSLIST
do not work properly. The fix is to use
OPTION=16384 in the ODBC connect string
or to select the Change BIGINT columns to
INT option in the MyODBC connect screen. You may
also want to select the Return matching
rows option.
If you have a BIGINT in your result, you
may get the error [Microsoft][ODBC Driver Manager]
Driver does not support this parameter. Try
selecting the Change BIGINT columns to
INT option in the MyODBC connect screen.
When you are coding with the ADO API and MyODBC, you need to
pay attention to some default properties that aren't
supported by the MySQL server. For example, using the
CursorLocation Property as
adUseServer returns a result of –1
for the RecordCount Property. To have the
right value, you need to set this property to
adUseClient, as shown in the VB code
here:
Dim myconn As New ADODB.Connection Dim myrs As New Recordset Dim mySQL As String Dim myrows As Long myconn.Open "DSN=MyODBCsample" mySQL = "SELECT * from user" myrs.Source = mySQL Set myrs.ActiveConnection = myconn myrs.CursorLocation = adUseClient myrs.Open myrows = myrs.RecordCount myrs.Close myconn.Close
Another workaround is to use a SELECT
COUNT(*) statement for a similar query to get the
correct row count.
To find the number of rows affected by a specific SQL
statement in ADO, use the RecordsAffected
property in the ADO execute method. For more information on
the usage of execute method, refer to
http://msdn.microsoft.com/library/default.asp?url=/library/en-us/ado270/htm/mdmthcnnexecute.asp.
For information, see ActiveX Data Objects(ADO) Frequently Asked Questions.
You should select the Return matching
rows option in the DSN.
For more information about how to access MySQL via ASP using MyODBC, refer to the following articles:
A Frequently Asked Questions list for ASP can be found at http://support.microsoft.com/default.aspx?scid=/Support/ActiveServer/faq/data/adofaq.asp.
Some articles that may help with Visual Basic and ASP:
MySQL BLOB columns and Visual Basic 6 by Mike Hillyer (
<mike@openwin.org>).How to map Visual basic data type to MySQL types by Mike Hillyer (
<mike@openwin.org>).
With all Borland applications where the Borland Database Engine (BDE) is used, follow these steps to improve compatibility:
Update to BDE 3.2 or newer.
Enable the
Don't optimize column widthsoption in the DSN.Enabled the
Return matching rowsoption in the DSN.
When you start a query, you can use the
Active property or the
Open method. Note that
Active starts by automatically issuing a
SELECT * FROM ... query. That may not be
a good thing if your tables are large.
Also, here is some potentially useful Delphi code that sets
up both an ODBC entry and a BDE entry for MyODBC. The BDE
entry requires a BDE Alias Editor that is free at a Delphi
Super Page near you. (Thanks to Bryan Brunton
<bryan@flesherfab.com> for this):
fReg:= TRegistry.Create;
fReg.OpenKey('\Software\ODBC\ODBC.INI\DocumentsFab', True);
fReg.WriteString('Database', 'Documents');
fReg.WriteString('Description', ' ');
fReg.WriteString('Driver', 'C:\WINNT\System32\myodbc.dll');
fReg.WriteString('Flag', '1');
fReg.WriteString('Password', '');
fReg.WriteString('Port', ' ');
fReg.WriteString('Server', 'xmark');
fReg.WriteString('User', 'winuser');
fReg.OpenKey('\Software\ODBC\ODBC.INI\ODBC Data Sources', True);
fReg.WriteString('DocumentsFab', 'MySQL');
fReg.CloseKey;
fReg.Free;
Memo1.Lines.Add('DATABASE NAME=');
Memo1.Lines.Add('USER NAME=');
Memo1.Lines.Add('ODBC DSN=DocumentsFab');
Memo1.Lines.Add('OPEN MODE=READ/WRITE');
Memo1.Lines.Add('BATCH COUNT=200');
Memo1.Lines.Add('LANGDRIVER=');
Memo1.Lines.Add('MAX ROWS=-1');
Memo1.Lines.Add('SCHEMA CACHE DIR=');
Memo1.Lines.Add('SCHEMA CACHE SIZE=8');
Memo1.Lines.Add('SCHEMA CACHE TIME=-1');
Memo1.Lines.Add('SQLPASSTHRU MODE=SHARED AUTOCOMMIT');
Memo1.Lines.Add('SQLQRYMODE=');
Memo1.Lines.Add('ENABLE SCHEMA CACHE=FALSE');
Memo1.Lines.Add('ENABLE BCD=FALSE');
Memo1.Lines.Add('ROWSET SIZE=20');
Memo1.Lines.Add('BLOBS TO CACHE=64');
Memo1.Lines.Add('BLOB SIZE=32');
AliasEditor.Add('DocumentsFab','MySQL',Memo1.Lines);
The following information is taken from the ColdFusion documentation:
Use the following information to configure ColdFusion Server
for Linux to use the unixODBC driver with
MyODBC for MySQL data sources. Allaire has verified that
MyODBC 2.50.26 works with MySQL 3.22.27 and ColdFusion for
Linux. (Any newer version should also work.) You can download
MyODBC at
http://dev.mysql.com/downloads/connector/odbc/.
ColdFusion version 4.5.1 allows you to us the ColdFusion
Administrator to add the MySQL data source. However, the
driver is not included with ColdFusion version 4.5.1. Before
the MySQL driver appears in the ODBC data sources drop-down
list, you must build and copy the MyODBC driver to
/opt/coldfusion/lib/libmyodbc.so.
The Contrib directory contains the program
mydsn-
which allows you to build and remove the DSN registry file for
the MyODBC driver on ColdFusion applications.
xxx.zip
For more information and guides on using ColdFusion and MyODBC, see the following external sites:
Refer to MySQL ColdFusion unixODBC MyODBC and Solaris - how to succeed
ColdFusion (on Solaris and NT with service pack 5), How-to: MySQL and ColdFusion.
Troubleshooting Data Sources and Database Connectivity for Unix Platforms.
Open Office (http://www.openoffice.org) How-to: MySQL + OpenOffice. How-to: OpenOffice + MyODBC + unixODBC.
Sambar Server (http://www.sambarserver.info) How-to: MyODBC + SambarServer + MySQL.
The following section details some common errors and their suggested fix or alternative solution. If you are still experiencing problems, use the MyODBC mailing list; see Section 23.1.7.1, “MyODBC Community Support”.
Many problems can be resolved by upgrading your MyODBC drivers to the latest available release. On Windows, you should also make sure that you have the latest versions of the Microsoft Data Access Components (MDAC) installed.
24.1.6.3.1:
Question:
Are MyODBC 2.50 applications compatible with MyODBC 3.51?
Answer:
Applications based on MyODBC 2.50 should work fine with MyODBC 3.51 and later versions. If you find something is not working with the latest version of MyODBC which previously worked under an earlier version, please file a bug report. See Section 23.1.7.2, “How to Report MyODBC Problems or Bugs”.
24.1.6.3.2:
Question:
I have installed MyODBC on Windows XP x64 Edition or
Windows Server 2003 R2 x64. The installation completed
successfully, but the MyODBC driver does not appear in
ODBC Data Source Administrator.
Answer:
This is not a bug, but is related to the way Windows x64
editions operate with the ODBC driver. On Windows x64
editions, the MyODBC driver is installed in the
%SystemRoot%\SysWOW64 folder.
However, the default ODBC Data Source
Administrator that is available through the
Administrative Tools or
Control Panel in Windows x64 Editions
is located in the
%SystemRoot%\system32 folder, and
only searches this folder for ODBC drivers.
On Windowx x64 editions, you should use the ODBC
administration tool located at
%SystemRoot%\SysWOW64\odbcad32.exe,
this will correctly locate the installed MyODBC drivers
and enable you to create a MyODBC DSN.
This issue was originally reported as Bug #20301.
24.1.6.3.3:
Question:
When connecting or using the
button in ODBC Data Source
Administrator I get error 10061 (Cannot connect
to server)
Answer:
This error can be raised by a number of different issues,
including server problems, network problems, and firewall
and port blocking problems. For more information, see
Section A.2.2, “Can't connect to [local] MySQL server”.
24.1.6.3.4:
Question:
The following error is reported when using transactions:
Transactions are not enabled
Answer:
This error indicates that you are trying to use
transactions with a MySQL table that does not support
transactions. Transactions are supported within MySQL when
using the InnoDB and
BDB database engines.
You should check the following before continuing:
Verify that your MySQL server supports a transactional database engine. Use
SHOW ENGINESto obtain a list of the available engine types.Verify that the tables you are updating use a transaction database engine.
Ensure that you have not enabled the
disable transactionsoption in your DSN.
24.1.6.3.5:
Question:
The following error is reported when I submit a query:
Cursor not found
Answer:
This occurs because the application is using the old MyODBC 2.50 version, and it did not set the cursor name explicitly through SQLSetCursorName. The fix is to upgrade to MyODBC 3.51 version.
24.1.6.3.6:
Question:
Access reports records as #DELETED#
when inserting or updating records in linked tables.
Answer:
If the inserted or updated records are shown as
#DELETED# in the access, then:
If you are using Access 2000, you should get and install the newest (version 2.6 or higher) Microsoft MDAC (
Microsoft Data Access Components) from http://www.microsoft.com/data/. This fixes a bug in Access that when you export data to MySQL, the table and column names aren't specified. Another way to work around this bug is to upgrade to MyODBC 2.50.33 or higher and MySQL 3.23.x or higher, which together provide a workaround for the problem.You should also get and apply the Microsoft Jet 4.0 Service Pack 5 (SP5) which can be found at http://support.microsoft.com/default.aspx?scid=kb;EN-US;q239114. This fixes some cases where columns are marked as
#DELETED#in Access.Note: If you are using MySQL 3.22, you must apply the MDAC patch and use MyODBC 2.50.32 or 2.50.34 and up to work around this problem.
For all versions of Access, you should enable the MyODBC
Return matching rowsoption. For Access 2.0, you should additionally enable theSimulate ODBC 1.0option.You should have a timestamp in all tables that you want to be able to update..
You should have a primary key in the table. If not, new or updated rows may show up as
#DELETED#.Use only
DOUBLEfloat fields. Access fails when comparing with single-precision floats. The symptom usually is that new or updated rows may show up as#DELETED#or that you can't find or update rows.If you are using MyODBC to link to a table that has a
BIGINTcolumn, the results are displayed as#DELETED. The work around solution is:Have one more dummy column with
TIMESTAMPas the data type.Select the
Change BIGINT columns to
                    INT
option in the connection dialog in ODBC DSN Administrator.Delete the table link from Access and re-create it.
Old records still display as
#DELETED#, but newly added/updated records are displayed properly.
24.1.6.3.7:
Question:
How do I handle Write Conflicts or Row Location errors?
Answer:
If you see the following errors, select the
Return Matching Rows option in the DSN
configuration dialog, or specify
OPTION=2, as the connection parameter:
Write Conflict. Another user has changed your data. Row cannot be located for updating. Some values may have been changed since it was last read.
24.1.6.3.8:
Question:
Exporting data from Access 97 to MySQL reports a
Syntax Error.
Answer:
This error is specific to Access 97 and versions of MyODBC earlier than 3.51.02. Update to the latest version of the MyODBC driver to resolve this problem.
24.1.6.3.9:
Question:
Exporting data from Microsoft DTS to MySQL reports a
Syntax Error.
Answer:
This error occurs only with MySQL tables using the
TEXT or VARCHAR data
types. You can fix this error by upgrading your MyODBC
driver to version 3.51.02 or higher.
24.1.6.3.10:
Question:
Using ODBC.NET with MyODBC, while fetching empty string (0 length), it starts giving the SQL_NO_DATA exception.
Answer:
You can get the patch that addresses this problem from http://support.microsoft.com/default.aspx?scid=kb;EN-US;q319243.
24.1.6.3.11:
Question:
Using SELECT COUNT(*) FROM
within
Visual Basic and ASP returns an error.
tbl_name
Answer:
This error occurs because the COUNT(*)
expression is returning a BIGINT, and
ADO can't make sense of a number this big. Select the
Change BIGINT columns to
            INT
option
(option value 16384).
24.1.6.3.12:
Question:
Using the AppendChunk() or
GetChunk() ADO methods, the
Multiple-step operation generated errors. Check
              each status value
error is returned.
Answer:
The GetChunk() and
AppendChunk() methods from ADO doesn't
work as expected when the cursor location is specified as
adUseServer. On the other hand, you can
overcome this error by using
adUseClient.
A simple example can be found from http://www.dwam.net/iishelp/ado/docs/adomth02_4.htm
24.1.6.3.13:
Question:
Access Returns Another user had modified the
record that you have modified while editing
records on a Linked Table.
Answer:
In most cases, this can be solved by doing one of the following things:
Add a primary key for the table if one doesn't exist.
Add a timestamp column if one doesn't exist.
Only use double-precision float fields. Some programs may fail when they compare single-precision floats.
If these strategies don't help, you should start by making a log file from the ODBC manager (the log you get when requesting logs from ODBCADMIN) and a MyODBC log to help you figure out why things go wrong. For instructions, see Section 23.1.3.8, “Getting an ODBC Trace File”.
There are many different places where you can get support for using MyODBC. You should always try the MyODBC Mailing List or MyODBC Forum. See Section 23.1.7.1, “MyODBC Community Support”, for help before reporting a specific bug or issue to MySQL.
MySQL AB provides assistance to the user community by means of
its mailing lists. For MyODBC-related issues, you can get help
from experienced users by using the
<myodbc@lists.mysql.com> mailing list. Archives are
available online at
http://lists.mysql.com/myodbc.
For information about subscribing to MySQL mailing lists or to browse list archives, visit http://lists.mysql.com/. See Section 1.7.1, “MySQL Mailing Lists”.
Community support from experienced users is also available through the MyODBC Forum. You may also find help from other users in the other MySQL Forums, located at http://forums.mysql.com. See Section 1.7.2, “MySQL Community Support at the MySQL Forums”.
If you encounter difficulties or problems with MyODBC, you
should start by making a log file from the ODBC
Manager (the log you get when requesting logs from
ODBC ADMIN) and MyODBC. The procedure for
doing this is described in
Section 23.1.3.8, “Getting an ODBC Trace File”.
Check the MyODBC trace file to find out what could be wrong. You
should be able to determine what statements were issued by
searching for the string >mysql_real_query
in the myodbc.log file.
You should also try issuing the statements from the
mysql client program or from
admndemo. This helps you determine whether
the error is in MyODBC or MySQL.
If you find out something is wrong, please only send the
relevant rows (maximum 40 rows) to the myodbc
mailing list. See Section 1.7.1, “MySQL Mailing Lists”. Please never
send the whole MyODBC or ODBC log file!
You should ideally include the following information with the email:
Operating system and version
MyODBC version
ODBC Driver Manager type and version
MySQL server version
ODBC trace from Driver Manager
MyODBC log file from MyODBC driver
Simple reproducible sample
Remember that the more information you can supply to us, the more likely it is that we can fix the problem!
Also, before posting the bug, check the MyODBC mailing list archive at http://lists.mysql.com/myodbc.
If you are unable to find out what's wrong, the last option is
to create an archive in tar or Zip format
that contains a MyODBC trace file, the ODBC log file, and a
README file that explains the problem. You
can send this to ftp://ftp.mysql.com/pub/mysql/upload/. Only MySQL
engineers have access to the files you upload, and we are very
discreet with the data.
If you can create a program that also demonstrates the problem, please include it in the archive as well.
If the program works with another SQL server, you should include an ODBC log file where you perform exactly the same SQL statements so that we can compare the results between the two systems.
Remember that the more information you can supply to us, the more likely it is that we can fix the problem.
You can send a patch or suggest a better solution for any
existing code or problems by sending a mail message to
<myodbc@lists.mysql.com>.
The MyODBC Change History (Changelog) is located with the main Changelog for MySQL. See Section D.3, “MySQL Connector/ODBC (MyODBC) Change History”.